

As a network administrator, troubleshooting network issues is part of your day-to-day. One indispensable tool when working on network-related problems is the tcpdump Linux command.
This tutorial will walk you through some real-world examples of how tcpdump can aid you in diagnosing common network problems. By the end of this tutorial, you will have a better understanding of how to leverage tcpdump to troubleshoot your own network issues.
Prerequisites
This tutorial will be a hands-on demonstration. If you’d like to follow along, be sure you have a Linux machine. This tutorial uses Ubuntu 20.04, but any modern-day Linux distribution will work.
Installing the tcpdump Linux Tool
Most modern Linux distributions, especially servers, already have tcpdump. But if not, don’t worry because the installation is sweat-free and quick.
1. Log in to your Linux computer using your preferred SSH client.
2. First, check if tcpdump is already installed by running the below command.
sudo apt list --installed tcpdumpIf tcpdump exists on your machine, you’ll see a similar output to the screenshot below.

If tcpdump does not exist, you’ll get the below result instead.

3. Once you’ve confirmed that tcpdump is not installed, run the below commands to install it.
# Update the package index
sudo apt update -y

# Install tcpdump
sudo apt install tcpdump -y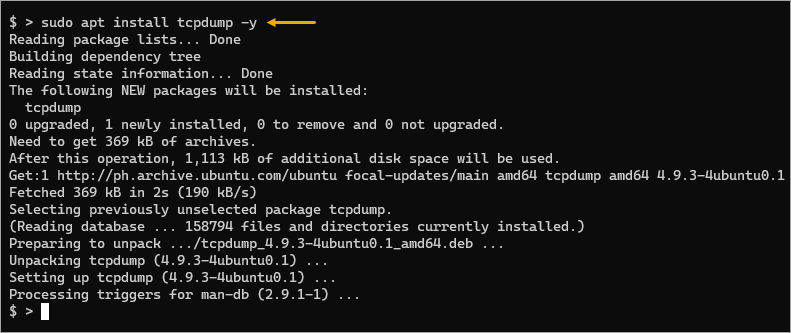
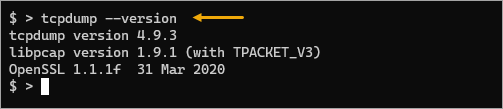
4. Finally, check the installed tcpdump version by running the below command.
tcpdump --versionAs of this writing, the latest tcpdump version from the Ubuntu repository is 4.9.3.
Capturing Packets Traffic on the Default Interface
The primary use of tcpdump is capturing packets. Thanks to the pcap library, the tool can capture packets from different network types, such as Ethernet, Wi-Fi, PPP, etc.
The syntax for the basic form of the tcpdump command is as follows.
tcpdump [options] [expression]
Where:
options: Set various tcpdump options. Options control how tcpdump captures and displays the packets.expression: Filter or specify what type of traffic to capture. Expressions are discussed in greater detail later in this tutorial.
The most basic use case for tcpdump is to capture all traffic on your default network interface and display the data to the standard output.
Run the tcpdump command without options or expressions to capture all traffic on your default interface.
sudo tcpdump
You must run tcpdump as root or with the sudo prefix because accessing the network interfaces is a privileged operation.
The tcpdump tool captures packets and prints output to the terminal, as shown below. When you believe you’ve captured enough packets, press CTRL+C to stop the capture.

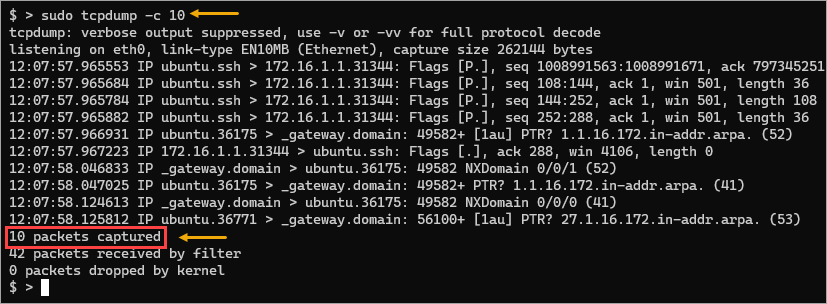
Limiting Packet Capture Count
The tcpdump Linux command can quickly overwhelm your terminal with output, and it is best only to capture a small amount of data at a time.
You can include the -c option to specify the number of packets tcpdump should capture before it exits. This option is often applicable when you only want to capture a small amount of data for analysis.
To do so, run the below command and change the number after the -c option. This example captures up to 10 packets only and automatically terminates.
sudo tcpdump -c 10
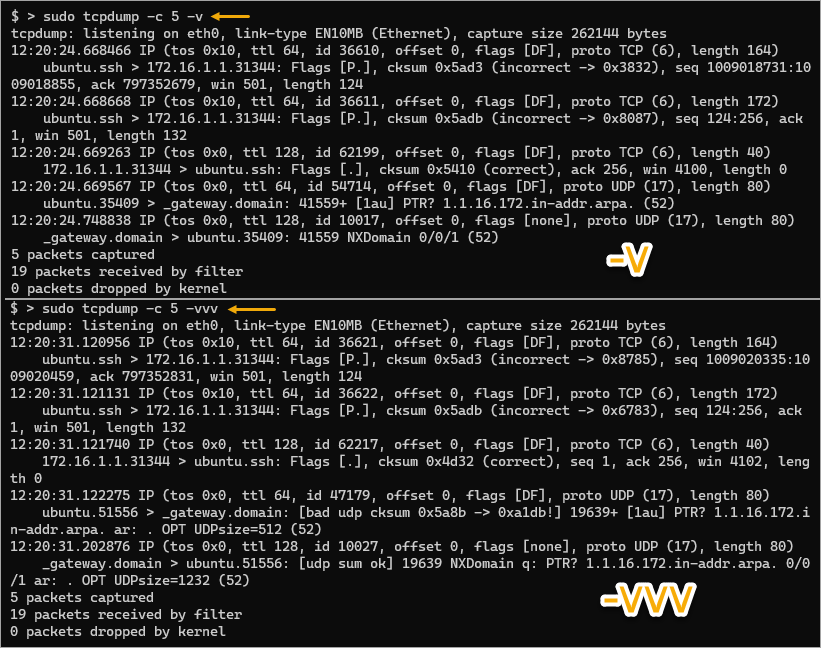
Increasing Verbosity
During packet capture, you may find that, at times, the default output may not contain or show in-depth information. Fortunately, the tcpdump Linux tool gives you three levels of verbosity represented by the -v, -vv, and -vvv flags.
When using these options, tcpdump parses and prints lots more information for each packet, like time to live(TTL), identification, etc.
# Verbose
sudo tcpdump -v

# Even more verbose
sudo tcpdump -vv

# Most verbose
sudo tcpdump -vvv
For a better perspective, refer to the below images comparing the difference in detail between -v and -vvv.
Capturing Packets on a Specific or All Interfaces
In the previous example, tcpdump was capturing packets on the default network interface, which means you have only one interface to mind. But what if you have multiple interfaces and want to capture traffic on a specific interface or all the interfaces?
The tcpdump Linux command allows you to specify which network interface to capture using the -i flag. This flag accepts the interface name as the value, which means you need to know the interface name first.
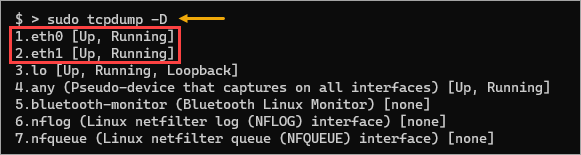
1. Run the tcpdump command with the -D option to print a list of all available interfaces on the machine.
sudo tcpdump -DAs you can see below, there are seven interfaces on this machine. Your computer may have a different set of network interfaces. This example focuses only on the ethernet network interfaces, specifically eth0 and eth1.
2. Next, run the below command to start capturing packets on the specific interface you want. This example captures the eth1 interface. Also, to limit the number of captured packets, the below command uses the -c flag followed by the count.
sudo tcpdump -i eth1 -c 5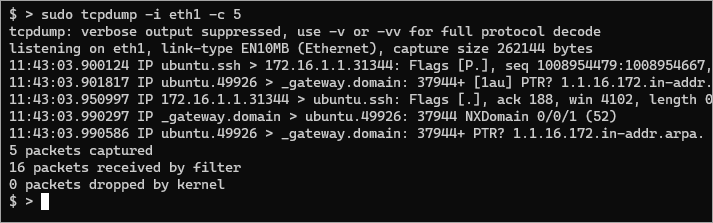
3. Instead of specifying one interface, you can also capture packets on all interfaces simultaneously. To do so, set any as the parameter value for -i.
sudo tcpdump -i any -c 5Why would you want to capture packets on all interfaces? Here are some common reasons.
For one, capturing traffic on all interfaces allows you to see all the traffic passing through your system, even if it’s not destined for your system.
Also, you can see what services and protocols pass through your network. This information can be helpful when configuring firewall rules or other security measures, especially when building new servers.
Adding Filters to the tcpdump Linux Command
Wildly capturing packets is not always the best approach. The amount of data can become confusing and may hinder your troubleshooting. Why? Because you may be capturing traffic that is not relevant to the situation.
Filters come in handy in these situations. The tcpdump tool has many built-in filters for capturing specific types of traffic. You may combine these filters to capture only the relevant traffic. Below are some examples.
Filtering by Port Number
For example, if you are troubleshooting an SSH server issue, you probably don’t care about other types of traffic passing through your network.
Run the command below to capture all traffic destined for port 22, the default SSH port.
sudo tcpdump -c 5 port 22
As you can see, the tool only captured port 22 traffic as the source or destination.

How about if you’re only interested in HTTP traffic? You only need to replace the port number with your HTTP port, which by default is port 80.
sudo tcpdump -c 1 port 80
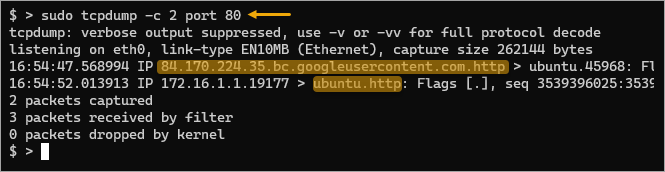
Note: The tcpdump tool is smart enough to recognize service protocol names in place of port numbers. For example, instead of specifying port 22 for filtering SSH traffic, you may specify port ssh instead. The same goes for port 80 for HTTP traffic, port http.
Filtering by Protocol
Don’t let the name tcpdump fool you into thinking it only works with TCP traffic. This tool can also capture non-TCP traffic like ICMP or UDP.
For example, the below command captures packets from any interface but only filters UDP traffic.
sudo tcpdump -i any -c 5 udp
As a result, the below results show UDP traffic only, which appears to be packets about NTP and DNS operations.

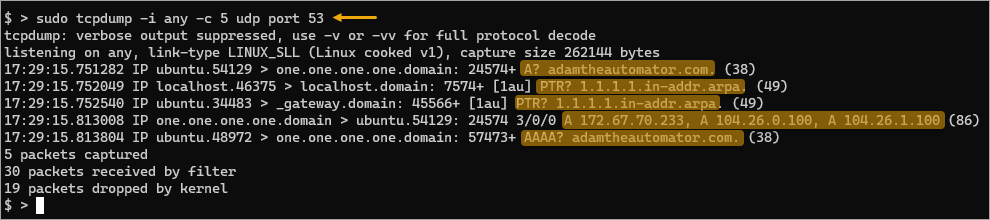
What if you only need to capture the DNS-related traffic? In that case, you can combine the filters udp and port 53. This way, the intended output should only show DNS-related packets.
sudo tcpdump -i any -c 5 udp port 53
This time, you only captured DNS-related (A, PTR, AAA lookup, and reply) traffic restricted to the UDP transport protocol.
Do you suspect that a ping flood attack is happening in your network? Why don’t you try finding the source and destination using tcpdump? To do so, run the below command to listen on any interface for ICMP traffic.
The -n flag prevents tcpdump from attempting to resolve the hostnames and shows the IP addresses instead. In this type of situation, bypassing name resolution can improve performance.
sudo tcpdump -n -i any icmp

You may have already realized that the tcpdump filters are powerful and flexible. By combining different filters, you can capture the traffic relevant to your desired result.
For more information on tcpdump filters, consult the tcpdump man page.
Saving Captured Packets to a File on Disk
Displaying packet captures on the screen on the fly is fine for short captures. But if you’re generating huge packet captures, the on-screen output is no longer practical. You need a way to export the captured data to a file for later analysis or sharing.
Fortunately, tcpdump supports the ability to save captured packets to a file on disk. You must specify the -w option followed by the file path.
Run the command below to save all traffic passing through your system to a file called /tmp/capture.pcap. This command listens on any interface and captures a maximum of 20 packets before automatically exiting.
sudo tcpdump -i any -w /tmp/capture.pcap -vv -c 20

Now you have the packet capture file, and when you need to, you can read the file back into the terminal. To read a packet capture from a file, add the -r option followed by the packet capture filename.
sudo tcpdump -r /tmp/capture.pcap

Conclusion
This tutorial taught you to capture and analyze network traffic using the tcpdump Linux command. You’ve used common options and combined filters to generate accurate packet captures. You also used the tool to capture packets to file for later analysis and read the file back into the terminal.
The tcpdump Linux tool is essential in every network administrator’s toolbox. The knowledge you have gained in this tutorial helps you become effective and efficient in troubleshooting network issues.


