
Nothing signifies adulthood better than the appreciation of coffee as a flavour so here comes a cake that expresses this exact sentiment of mine!
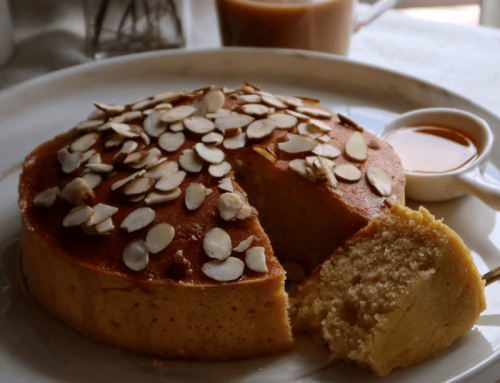
This Coffee Butter Cake resembles that of the coffee buns I can find in my local bakeries, especially so when it is paired with a cup of cold milk!
As usual, the write-up will be split into 1) Ingredients, 2) Method, and 3) Taste and Texture!
This Coffee Butter Cake resembles that of the coffee buns I can find in my local bakeries, especially so when it is paired with a cup of cold milk!
As usual, the write-up will be split into 1) Ingredients, 2) Method, and 3) Taste and Texture!
First up, the ingredients!
I am using the most basic way you can introduce coffee flavour into your bakes, which is the usage of coffee granules. You can feel free to add coffee-infusing ingredients such as Coffee Emulco, extract and so on!
If you are using 3-in-1 or 2-in-1 coffee granules, consider cutting back the amount of sugar used in this cake by about 5 grams if you would still like to be precise.
I would also strongly recommend adding nuts such as Walnuts to alleviate the flavour profile of the cake. About 85g should be good! I experimented with walnuts initially but I ran out when I was doing my final bake to be posted!
There is also a lot of adjustment that can be made for the individual to decide how intense the coffee flavour they would like of their cake!
Next, the method.
There is not much notable here except the simple fact that the coffee is infused by allowing it to dissolve in milk, hence the need to heat up the milk.
You could also used leftover coffee of course if it is equally concentrated.
Last but not least, the taste and texture.
For the taste, it has a distinctive coffee flavour that hits the right spot, with a slight buttery undertone. It is chewy, soft and fluffy. Definitely moist!
Problem Solving:
A confession here regarding the food photography. My cake did have small little holes in them and yes I still make such problems at times. These are the nicer slices! If you do have such problems, follow this link here to minimize the number and size of the holes. I suspect my sugar wasn’t room temperature when I mixed them in!
How to minimize the number of holes in my cake.
Next, it is very likely that if you cut your cake into very small slices like mine or while its still warm, its going to be crumbly. Refrigerate it for a while before cutting if you face this problem.
Coffee Butter Cake Recipe
by Javier Tan July-29-2018
Pair this moist and fluffy Coffee Butter Cake with a cup of cold milk to get a refreshing and delicious coffee flavour with each bite!
Ingredients
- 1 Cup or 225g Unsalted Butter, softened at room temperature
- 3/4 Cup + 2 Tablespoons or 175g Granulated White Sugar
- 1 and 1/2 Cups or 180g All Purpose/Plain Flour, Sifted
- 3/4 Teaspoon or 3g Baking Powder, Sifted
- 1/4 Teaspoon or 1.4g Table Salt
- 1/3 Cup + 1 Tablespoon or 105ml Full Cream Milk, Room Temperature
- 3 Large Eggs, Room Temperature, 55g each
- 1 Teaspoon or 5ml Vanilla Extract or 10ml of Vanilla Essence
- 2 Loosely Packed Tablespoons or 9g of Coffee Granules
- Coffee Essence / Related Flavouring ( Optional )
- Preheat your oven to 160 degrees C and line your 8 x 8 inches baking tray with parchment paper.
- In a small saucepan, heat the coffee granules and milk at low heat until all granules have dissolved. Set aside to cool to room temperature.
- Beat the unsalted butter slightly for a couple of minutes to fluff it up and loosen it.
- Add in the sugar to the butter and cream both together until light and fluffy.
- Whisk in the eggs one by one, mixing well after each addition. Mixing well is important at this stage!
- Whisk in the vanilla extract and salt and mix well.
- Whisk in the coffee milk mixture and mix well.
- In a separate bowl, combine the flour and baking powder and mix until well distributed, about two minutes.
- Sift in the flour and baking powder mixture into the batter and fold in, stopping immediately once mixed in.
- Transfer the batter to your lined baking tray and hit it against the counter a few times to dislodge excessive air bubbles. I did it in two separate times.
- Bake the cake for about 52-55 minutes or until a toothpick inserted into the middle comes out clean. If nearing an hour and the toothpick comes out with just very fine lumps, it is considered fully baked as well.
- Cool at room temperature for an hour before serving. Cool it upside down for a denser finish. This cake tastes best after being stored overnight at room temperature.
- Prep time:
- Cook time:
- Total time:
- Yield: 1 8 x 8 Inches Cake
Notes:
- Store at room temperature for up to 5 days. If placed in the fridge, it will be hardened and can lose flavour. Can be softened again after exposure to room temperature for a couple of hours.
- Do take note that if your cake has small little holes in it, it is perfectly alright but you can minimize it by following the methods suggested on the read up!
- If you would like to be updated for more recipes which I strive to create to perfection for sharing, do check out my Instagram, Facebook Page, or YouTube 🙂 Thank you so much for all of your support! Feel free to tag me or link back here!
Feel free to ask if you have any problems and
Enjoy!
– Bakeomaniac, Javier Tan


I have yet to try ur Coffee Butter Cake recipe……….made a C B cake umpteen years ago
If you do give it a go please do let me know how it go :p I am always open to feedback so that I can refine the recipes too! I think this cake is one that is worth the try!
Just made this cake, very good indeed
Thank you for sharing the recipe
Hello Cathy 😀 Thank you so much for leaving a comment and your kind words! I am so glad to hear that you enjoyed the recipe! Should you have any recipes you want me to try out or to recommend you can let me know too 🙂
Just tried this recipe. Absolutely love it! It’s easy to follow, tastes divine too!! Not too densed, just perfect.
Thank you so much for your kind praise and review of the recipe :p It gives me assurance that the recipe is going well and I am so glad to here that you like it!
Cheers to amazing bakes 😀
Tried this today. 1st cake: I used 3/4 cup of sugar and 10g of coffee. Baked in aluminium disposable foil for 43 mins. Turned out a bit dry because I used foil and not a normal baking tray. A little bitter. 2nd cake: I used 3/4 cup of sugar + 2 tsp (not tbsp), and 9g of coffee. Baked for 37 mins. Tasted much better. Thanks for the easy yummy recipe 😊
Hey Angeline! SOrry for my late reply and thank you for leaving a comment!
I am so glad to hear that you managed to find a way to make it work and that you like the recipe too! I haven’t tried baking these in aluminium foils before so that was a new point for me to learn too! This Coffee Butter Cake is moist and yummy, and now I feel like making some myself too :p!
Hi, may i know how deep is your baking tray?
About 2 to 2.5 inches deep 🙂 I would recommend doubling or multiplying the recipe by 1.5x if you have a taller dish and if you would want a taller cake!
Hi Javier for the coffee Granules can I use Nescafé ?
Hey Mindy, absolutely! I actually used Nescafe for my recipe as I drink it on a weekly basis!
Thanks Javier, I tried just now but how come my cake look super moist?
Hey Mindy! Thank you for dropping by! May I guess that the “moist part” of the cake is at the bottom of the cake or streaks of moist / dense portions?
Hi Javier, thx for d recipe. I tried it last night. Tastes good but the insides are not as fluffy as your picture. Its more densed n moist. What do you think i did wrong? Baked 180deg at 65mins.
*Ps: first time noob baker here.
Hey Khy, no worries!
Feel free to drop me a direct message on IG / FB if you don’t really like the back and forth messaging. However, may i ask what’s the size of your cake tin, and are there any undercooked portions? Hope to solve it for you!
Tried baking this cake today and it was yummy! My 1st bake and I’m Glad it’s a success. Exactly the way I like. Btw, I bake using disposable aluminium tray and needed ~60mins of baking.
Thanks for sharing this recipe and is definitely a keeper.
Hey Yili! Thank you for dropping by and sharing with me that this recipe worked out for you. I am so happy to hear that and it is exactly seeing that people enjoy my recipes that motivate me to continue sharing!
Also, the tip about the disposable aluminium tray is a really useful one! Hopefully the others see it 🙂
Hi. How do i make this cake a bit higher/rise? Do i need extra baking powder? Do you know why some butter cakes look high? Thanks for replying hehe I made one taste so good
Hey Nino! I am so glad that it turned out wel lfor you 😀
To make it rise even higher, the simplest way is to double the recipe. But other ways would to separate the egg yolk and whites, and then whip the egg whites! I think this is the most the baking powder can lift the cake as adding more still give the same results 😛 Hope that helps!
Really enjoyed your site. Thank you for sharing. You found a lifetime fan.
Hey Kandis 🙂 Am really happy and glad to share! Thank you for dropping by too!
Can I use caster sugar instead of granulated sugar ?
What do you mean by cool in upside down die denser finish?
Want to try to bake this cake . Thanks 🙏 for sharing
Hey Jennifer, thank you for dropping by my blog!
– Caster sugar is a good choice! It dissolves quicker than granulated!
– Depending on how you cool it, it might be thicker! So if you want a thicker cake, just cool it upside down 😀
Hope you will like this recipe as much as I do 😀
Hye Javier,
Can I use coffee emulco instead of coffee granules ? If yes, then do let me know how many grams of coffee emulco should I add into the cake batter ? Thanks in advance Javier ♥️
Hey Sharon, nice to hear from you and thank you for dropping by my blog!
Honestly, I am unsure of how much coffee emulco to use although it is definitely a suitable substitute for coffee granules. I am thinking perhaps to try 1 to 2 teaspoons (5 to 10ml) for a start. Hope that won’t be too strong!