How To Build A Miter Saw Station
- November 28, 2023
- 4 comment
Welcome to the exciting world of woodworking, where precision meets creativity! If you’ve ever found yourself frustrated with wobbly cuts or struggling to manage long pieces of lumber, it might be time to consider building your own Miter Saw Station. This versatile and essential workshop addition not only promises to elevate the accuracy of your cuts but also transforms the way you approach your woodworking projects. Imagine having a dedicated space designed to maximize efficiency and enhance your overall woodworking experience. Join us as we guide you through the step-by-step process of creating your personalized Miter Saw Station, tailored to fit your unique needs and workspace. Get ready to embark on a journey that will not only sharpen your woodworking skills but also inspire you to take on new and ambitious projects with confidence. Let’s turn your workshop into a precision hub, where every cut is a masterpiece waiting to happen!
What You Need To Know About Miter Saw Station
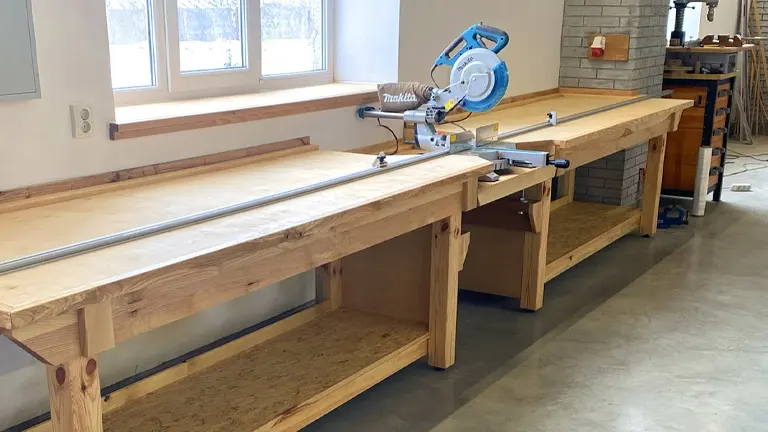
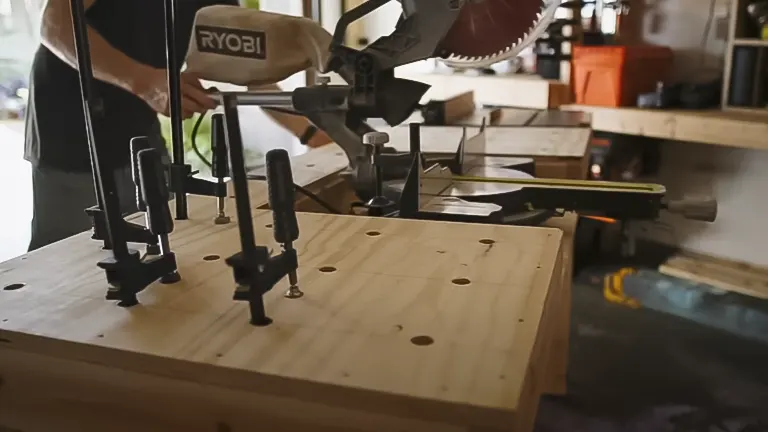
A Miter Saw Station is a specialized and efficient workspace designed for woodworking enthusiasts and professionals alike. This station serves as a dedicated hub for a miter saw, a versatile power tool commonly used for making precise angled cuts in wood and other materials. The Miter Saw Station typically features a stable and spacious work surface with integrated supports and extensions to accommodate long pieces of lumber. It often includes strategically placed fences and guides to ensure accuracy and consistency in cutting angles. This purpose-built setup enhances workflow by providing a centralized location for measuring, marking, and cutting materials, contributing to a cleaner and more organized workshop. The Miter Saw Station is not only a practical solution for woodworkers seeking precision and efficiency in their projects but also contributes to a safer and more enjoyable working environment.
Materials and Tools Needed When Building A Miter Saw Station
Building a miter saw station typically requires a combination of basic woodworking tools and some specialized tools to ensure accuracy and efficiency. Here’s a list of tools and materials you may need:
- Lumber: 2x4s are commonly used for the frame and structural components. The quantity will depend on the size and design of your miter saw station.
- Plywood: A 3/4-inch plywood sheet for the work surface and shelves. Ensure it is sturdy and flat.
- Screws: Various sizes of wood screws for attaching the frame, shelves, and work surface. Choose screws suitable for woodworking.
- Wood Glue: Strong wood glue to reinforce joints and add stability. Make sure it’s suitable for the type of wood you’re using.
- Paint or Finish (Optional): If you want to give your miter saw station a finished look, consider paint or a wood finish of your choice.
- Sandpaper: Sandpaper or a sanding block for smoothing rough edges and preparing the wood for finishing.
- Safety Gear: Safety glasses, ear protection, and a dust mask to protect yourself while cutting and sanding.
- Miter Saw: The star of the show! Choose a miter saw that suits your needs and fits well with the design of your station.
- Circular Saw: For cutting large sheets of plywood to size. A table saw can also be used if available.
- Drill: A power drill for making pilot holes and driving screws. Ensure it’s charged and equipped with the appropriate bits.
- Tape Measure: A reliable tape measure for accurate measurements during the planning and construction phases.
- Speed Square: A speed square helps ensure accurate angles and measurements, especially when making cuts with your miter saw.
- Clamps: Wood clamps are useful for holding pieces together while you secure them with screws or glue.
- Level: A level ensures that your miter saw station is even and stable.
- Pencil and Marking Tools: Pencils or markers for marking measurements and cut lines on the wood.
- Framing Square: A framing square helps ensure that your cuts and joints are at right angles, contributing to the accuracy of your miter saw station.
- Workbench or Sawhorses: A sturdy workbench or sawhorses provide additional support for assembling and working on your miter saw station.
- Jigsaw (Optional): If your design includes curved or intricate cuts, a jigsaw can be useful.
Ensure you have a clean and well-ventilated workspace, and always follow safety guidelines when using power tools.
Step by Step Process on How To Build A Miter Saw Station
Step 1: Gather Materials and Tools
To begin your miter saw station project, gather the fundamental materials that form its core structure. This includes procuring eight-foot 2x4s and a single sheet of 3/4″ plywood, which should be carefully divided lengthwise. These basic components will serve as the building blocks, ensuring a solid foundation for your miter saw station.
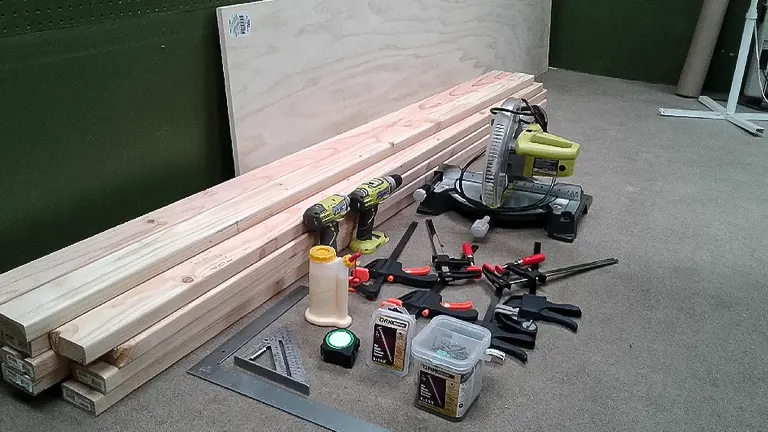
In tandem with the materials, assemble the necessary tools to facilitate the construction process. Key instruments include a tape measure for accurate measurements, a speed square to ensure precise angles, a miter saw for specialized cuts, a drill for boring holes and driving screws, and a circular saw for versatile cutting applications. While the use of clamps and a framing square can be advantageous during construction, it’s important to note that they are optional elements, providing flexibility for tailoring the project according to your specific requirements and preferences.
Step 2: Cut 2x4s to Length
Start by cutting all 2x4s to their specified lengths according to your preference. Ensuring precision during this step is essential for creating a miter saw station that is not only well-fitted but also stable in its structure.
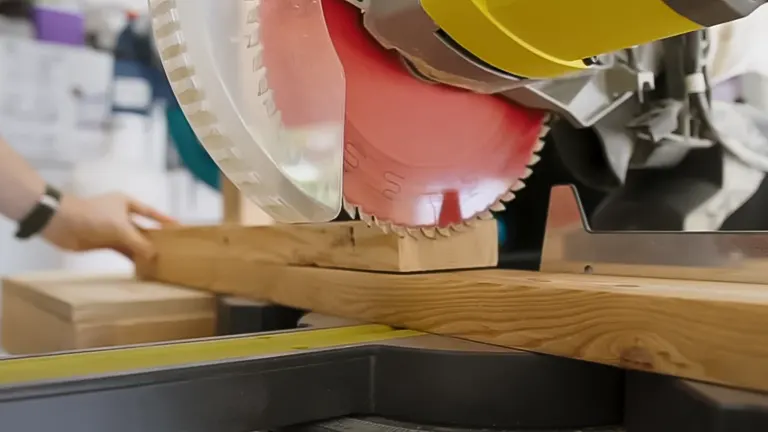
Accurate measurements and cuts lay the groundwork for a functional and reliable woodworking space. This straightforward task of cutting the 2x4s to their designated lengths sets the tone for the entire construction process. By adhering to the prescribed cut list, you guarantee that each piece fits seamlessly into its intended place, contributing to the overall stability and effectiveness of your miter saw station.
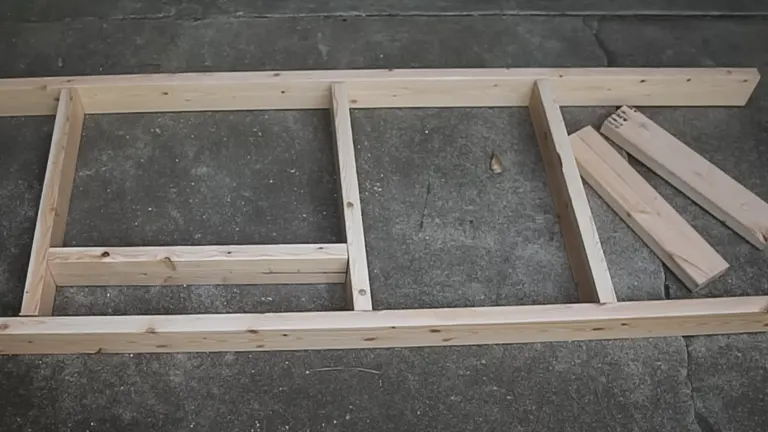
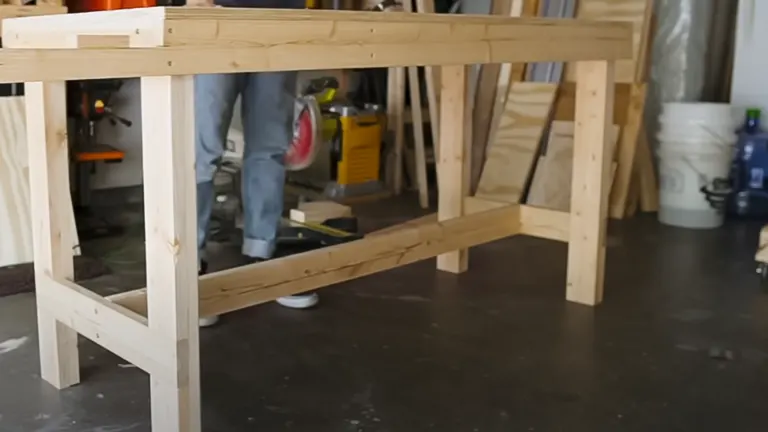
Step 3: Build the Right and Left Frames
Build the right and left frames as distinct entities in the construction process. To form the right frame, create four legs, each with small feet at the base. Secure front stretchers horizontally across the tops of these feet and then attach side stretchers along the inner sides of the legs. Complete the right frame by affixing the shorter leg riser on the left side and the longer one on the right. In parallel, mirror this construction process for the left frame, but with a reversal in the placement of the leg risers.
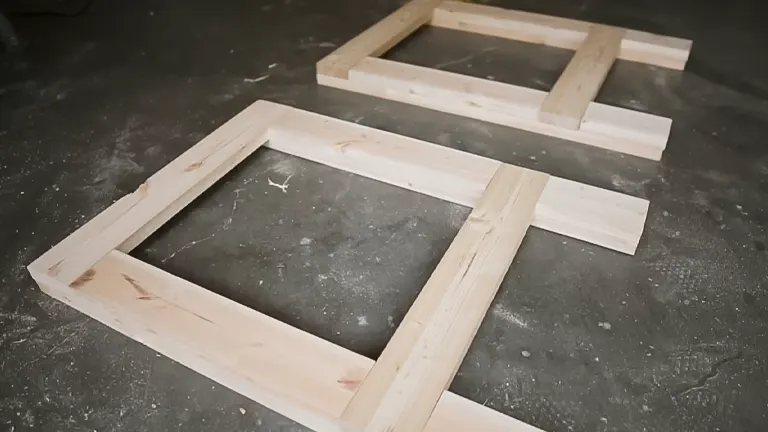
Building the frames separately allows for a systematic and organized assembly of your miter saw station. By breaking down the construction into distinct components, you simplify the process, ensuring that each frame is methodically crafted before integration. This step-by-step approach not only streamlines the construction process but also enhances the precision and stability of each frame, contributing to the overall durability of your miter saw station.
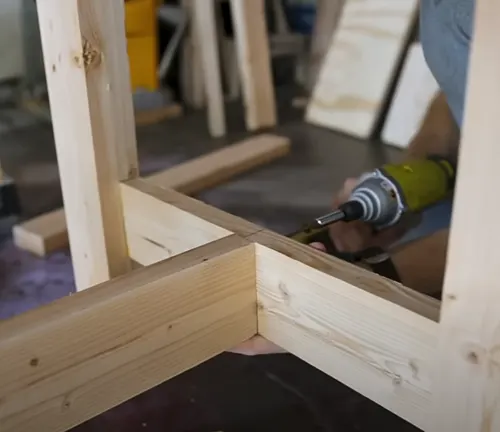
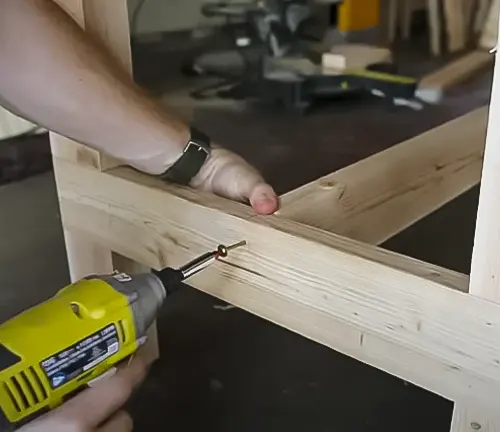
Step 4: Attach the Frames Together
Place the left and right frames at a distance of 24 inches from each other, establishing the initial alignment for your miter saw station. Lay the stretchers atop the short leg risers and firmly attach them using screws. This simple yet crucial step forms the basis for the station’s structural integrity. Add another stretcher at the rear’s bottom shelf level, securing it firmly to the legs. This additional reinforcement not only bolsters stability but also provides a solid foundation for the construction of subsequent elements.
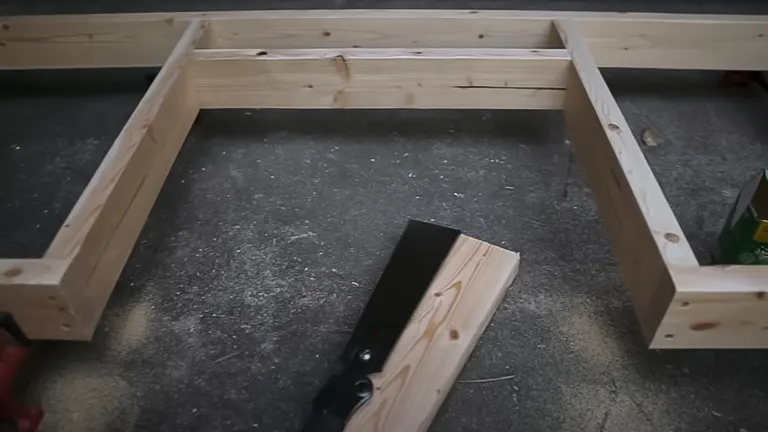
Proceed by installing a cross brace at the center of each top, fastening it securely to the stretcher. This strategic placement enhances the overall rigidity of the frames, ensuring that the miter saw station is robust and well-supported. The deliberate positioning of these components at specific intervals contributes to the station’s reliability, reinforcing its ability to withstand the demands of woodworking tasks.
Step 5: Cut and Install Plywood Shelves and Work Surface
Measure and cut both the bottom and top center shelves from a standard 24″ x 96″ plywood sheet to accommodate the dimensions required for your miter saw station. Attach these plywood shelves securely to the 2×4 stretchers, ensuring a snug fit that contributes to the overall stability of the structure. This straightforward yet pivotal step forms the basis for the functional and organizational aspects of your woodworking workspace.
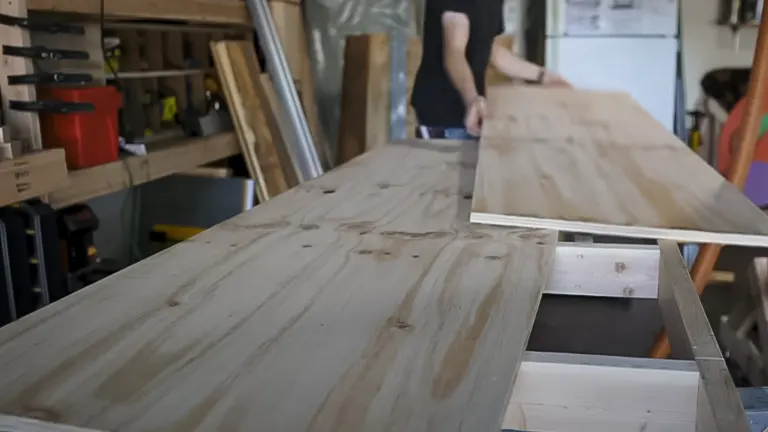
Subsequently, proceed to cut the top work surface from the remaining plywood, utilizing the dimensions suitable for your specific design. Secure this top surface to the 2×4 stretchers using screws, ensuring a robust connection along both the front and back. The careful attachment of the top work surface not only completes the construction of the miter saw station but also guarantees a flat and reliable area for your woodworking activities. This practical and efficient approach to installing the plywood components ensures that your miter saw station is not only structurally sound but also ready to meet the demands of various projects.
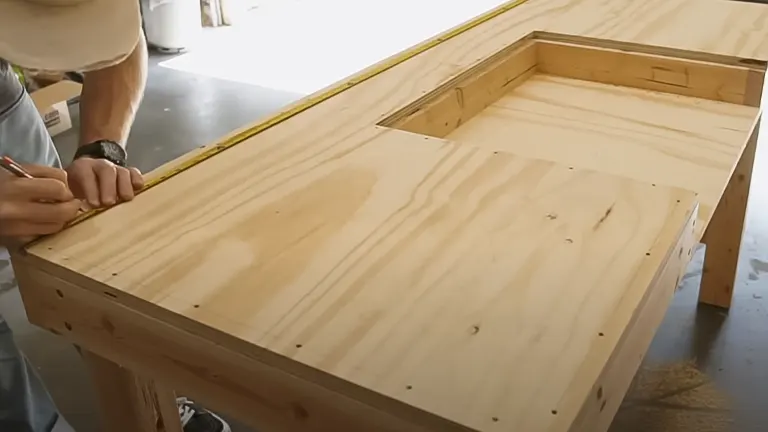
Step 6: Mount Your Miter Saw
The miter saw station is designed with a practical 3 1/2″ recessed shelf to accommodate the miter saw. Should your saw possess a distinct table height, make the necessary adjustments for a seamless fit. Center the miter saw precisely on the designated middle shelf, allowing the handle to protrude for effortless maneuverability during your woodworking tasks. To ensure the miter saw is securely in place, use long screws or lag bolts, selecting them based on the specific mounting holes of your saw.
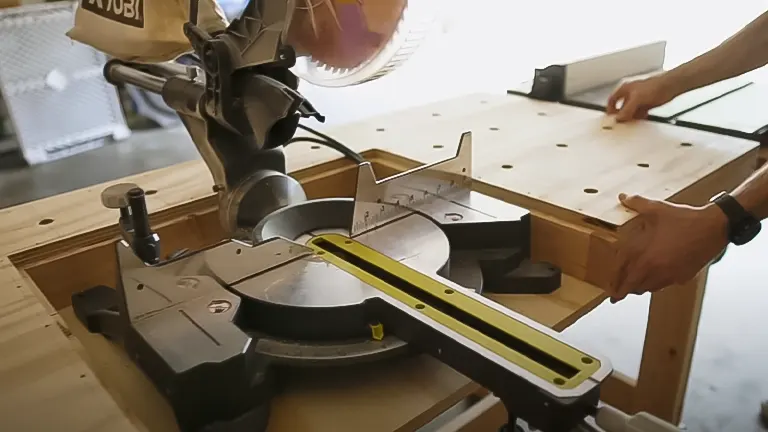
By tailoring the design to account for potential variations in the miter saw’s specifications, this approach ensures adaptability and functionality in the construction process. Placing the miter saw strategically at the center of the middle shelf optimizes accessibility and ease of use. The subsequent securement with appropriately sized screws or lag bolts provides a robust foundation, guaranteeing the stability necessary for accurate and safe operation during your woodworking endeavors.
Building your own miter saw station is a practical and rewarding project that can significantly improve your woodworking experience. By following these steps and tailoring the design to your needs, you’ll have a sturdy and efficient workspace for your miter saw.
Tips on How to Maintain and Take Care a Miter Saw Station
- Regular Cleaning: Regularly sweep away the sawdust and bits around my miter saw and the station. I usually use a shop vac to get into the nooks and crannies, keeping things clean for precise cuts.
- Inspect and Tighten: If anything feels a bit loose, I grab my trusty wrench and tighten things up for stability.
- Lubricate Moving Parts: The moving parts of my miter saw get a dose of lubrication now and then. It’s like giving it a little massage to ensure it glides through cuts effortlessly.
- Blade Maintenance: After each project, I take a moment to clean my miter saw blade. If it’s been through the wringer, a bit of sharpening is in order. Happy blades make for happy woodworking.
- Check and Calibrate: I make a habit of double-checking the miter and bevel angles to keep my cuts on point. It’s like ensuring my saw is still grooving to the right tunes.
- Dust Collection System: If there’s a dust collection system in place, I make sure it gets its regular spa day. Emptying the dust bin and unclogging the hoses keeps everything running smoothly, much like a deep breath for my workspace.
- Organize Tools and Accessories: I’m a stickler for tool organization. It’s not just about keeping things neat; it’s about ensuring each tool has its place, so they’re always ready for action.
- Weather Protection: Since my workshop isn’t immune to the elements, I pay attention to humidity. A bit of wood sealing and rust-resistant coatings help my miter saw station weather any storm.
- Safety First: Every now and then, I run through the safety features. It’s like ensuring my miter saw is suited up with its safety gear—a little peace of mind goes a long way.
- Continuous Learning: I keep my ears to the ground for any new tips or tricks related to miter saws. Learning and adapting is part of the game, like discovering the latest dance moves for my saw.
By incorporating these maintenance practices into your routine, you’ll not only extend the life of your miter saw station but also create a safer and more efficient workspace for your woodworking projects.
Importance of Miter Saw Station in Woodworking
- Enhanced Precision and Accuracy: A miter saw station provides a stable and leveled platform for your miter saw, ensuring that every cut is executed with precision. The station’s design allows for accurate angle adjustments and consistent measurements, crucial for creating seamless joints and precise angles in your woodworking projects.
- Improved Workflow and Efficiency: One of the key advantages of a miter saw station is its ability to streamline your workflow. With a designated space for your miter saw, you can efficiently move through cutting tasks without the need to set up and take down your equipment repeatedly. This translates to significant time savings, allowing you to focus more on the creative aspects of your projects.
- Safety First: Safety should always be a top priority in any workshop. A miter saw station provides a secure and stable environment for operating your miter saw. The station’s structure minimizes the risk of vibrations or wobbling during cutting, reducing the likelihood of accidents. Additionally, a well-designed station often includes features like dust collection systems, contributing to a cleaner and safer workspace.
- Organization and Accessibility: Imagine having all your tools and accessories neatly organized within arm’s reach. A miter saw station typically includes shelves and storage compartments, providing a dedicated space for items like measuring tools, safety gear, and extra saw blades. This organizational aspect not only contributes to a clutter-free workspace but also ensures that everything you need is readily accessible.
- Customization for Unique Needs: Every woodworker has unique preferences and specific project requirements. Building your own miter saw station allows for customization to suit your individual needs. Whether it’s adding extra storage, incorporating features for special projects, or personalizing the station’s appearance, having a custom-built workspace enhances the overall woodworking experience.
- Consistency in Cuts: Consistency is key in woodworking, and a miter saw station helps maintain that consistency. Once the station is set up and calibrated, you can expect uniform and accurate cuts in every piece of wood you process. This not only saves time but also contributes to the professional quality of your finished projects.
In essence, a miter saw station is more than just a dedicated space for your saw—it’s a cornerstone for efficiency, safety, and creativity in woodworking. Whether you’re a seasoned woodworker or just starting, investing in a miter saw station is a step towards elevating the quality of your craftsmanship and making your woodworking journey more enjoyable.
Related Post
- 7 DIY Miter Saw Station Plans For Your Workshop
- Miter Saw Guide: Single VS Dual Bevel
- How to Adjust a Miter Saw for Accurate Cuts
- 5 Miter Saw Tips to Make Accurate Cuts
Conclusion
In conclusion, embarking on the journey to build a miter saw station is a rewarding endeavor for any woodworking enthusiast. This comprehensive guide provides a roadmap for creating a practical and customized workspace tailored to individual needs. By meticulously planning the dimensions, cutting and assembling the wood components with precision, and incorporating thoughtful features like shelves and work surfaces, the result is not just a station but a functional hub for creativity. The step-by-step process, from framing the right and left structures to mounting the miter saw, ensures a sturdy and reliable construction. Beyond the practical benefits of enhanced precision and efficiency, the ability to personalize the station allows for a workspace that aligns with one’s unique woodworking style. As the final touches, such as sanding and finishing, are applied, the culmination is not just a miter saw station but a crafted space that sets the stage for countless woodworking projects to come. Happy building!
FAQs
- Can I customize the dimensions of the miter saw station to fit my specific workshop space?
Absolutely! In fact, customization is encouraged. Before starting the build, measure your workshop space and sketch a plan that aligns with those dimensions. This ensures the miter saw station seamlessly integrates into your workspace, optimizing both functionality and efficiency. - What’s the significance of adding a 3 1/2″ recessed shelf for the miter saw?
The recessed shelf serves a dual purpose. It provides a stable platform for the miter saw, ensuring it sits securely, and also aids in creating a level work surface. This design feature allows for easy movement of the miter saw while maintaining a consistent height with the surrounding work surface. - Can I use different types of wood for the construction of the miter saw station?
Certainly. While the guide suggests using 2×4 lumber and plywood, you have the flexibility to choose wood types based on your preferences and availability. Just ensure the selected wood is sturdy and can withstand the demands of a workshop environment. - Is it necessary to add a dust collection system to the miter saw station?
While not mandatory, incorporating a dust collection system is highly recommended for a cleaner and safer workspace. Sawdust accumulation can be a safety hazard and impact the accuracy of your cuts. Adding a dust collection system helps maintain a tidy environment and enhances overall safety. - Can I install additional features like a power strip or lighting in the miter saw station?
Absolutely! Customization is not limited to the basic structure. Adding features like a power strip for convenient tool access or lighting for better visibility are excellent ideas. Personalizing your miter saw station to suit your workflow and preferences enhances its functionality and makes it uniquely yours.
As you reach the end of this step-by-step guide on building a miter saw station, you now possess the knowledge and skills to create a dedicated and efficient workspace for your woodworking endeavors. Each stage, from planning to the final touches, has contributed to the realization of a practical and personalized station. With your newly constructed miter saw station, you’re not just equipped with a woodworking tool; you’ve crafted an integral space that fosters precision and creativity. Here’s to a future filled with successful projects in your newly organized and purposeful workshop. Happy woodworking!

Benjamin Brooks
Forestry AuthorGreetings! I'm Benjamin Brooks, and my journey over the past 15 years has revolved around the fascinating realms of content creation, expertise in snow clearing, and the intricate world of lumberjacking and landscaping. What began as a simple curiosity about the natural world and heavy machinery has evolved into a passionate profession where my love for crafting words intertwines seamlessly with my lumberjacking and garden skills.
4 comments
Are there plans for sale?
Steve Jenkins
December 3, 2023 11:09 pmThanks for the insight and inspiration to move forward with mine.
Stanley Sutton
December 2, 2023 3:58 pmDid I miss the “given cut list”?


I recently bought 3 acres with a 12x28 barn-style shed on it. I am planning on taking on the huge task of turning it into a tiny home. Thank you for the article. I have the saws (including a new table saw) and this gives me the encouragement to take the next big step to start making cabinets, etc.
Elizabeth Patrick
December 4, 2023 5:07 pm