david tilbury Posted August 31, 2022 Share Posted August 31, 2022 This has been one of those 'on off' projects over the past 3 years but hopefully now on the final run....i did have a converted Moki 210 to petrol installed but as the bottom of the head stuck out of the cowl it was a no no for F4H so it has now been converted or will be electric by the time i've finished. The airframe was brought as a kit, this will be my second YA Spitfire, the first being built some 20 years ago, most of my time has been spent creating 3D printed parts of the cockpit interior which is now finished. I used the BT 83" Spitfire canopy which fits as the YA wasn't quite right and had gone a pale yellow. Main retracts are Sierra from the States, wheels my own along with the retracting tailwheel assembly. All of the accessories which came with the kit were dumped as they are not scale, cannons/rads etc. Also re-made the tailplane/elevators/rudder/ailerons/rads/exhausts basically starting again LOL. Once i've finished a couple of other things in the workshop i'll be back on with the build, will post progress..... Cheers 5 1 Quote Link to comment Share on other sites More sharing options...
Jon H Posted August 31, 2022 Share Posted August 31, 2022 (edited) You are putting my YA Spit to shame Dave, but thats ok. Mine is not intended to be a scale winner, i just want it to look nice as it passes by. Very good to know the BT canopy fits though as mine too is yellow and all cracked up. I tried getting one from Richard Rawle but he went quiet on me. Did you have to modify the BT canopy much or did it just drop right on? As for making it electric..sad times. Shame i dont have my 60cc inline done yet as it would have been perfect. 😞 Edited August 31, 2022 by Jon - Laser Engines Quote Link to comment Share on other sites More sharing options...
Graham Davies 3 Posted August 31, 2022 Share Posted August 31, 2022 David, that is 'next level' modelling. Fantastic, and inspirational. Graham Quote Link to comment Share on other sites More sharing options...
david tilbury Posted August 31, 2022 Author Share Posted August 31, 2022 Thanks John, yeh shame about the engine, inline engines seem to be very popular....:-) If you have the glass canopy frame that came with the kit then the canopy once cut and trimmed fits ok....not much else will unless you make your own. Many thanks Graham....it's been great fun getting to this point....i was hoping to finish it in the summer but other things got in the way....but pretty much clear now..:-) Cheers Quote Link to comment Share on other sites More sharing options...
Jon H Posted August 31, 2022 Share Posted August 31, 2022 (edited) My model has only a clear plastic canopy with no separate frame. Mine also lacks the fibreglass wing tips so it might be a very early one. Not too sure. I have tried to source a canopy from Richard Rawle and Fokkerc but so far have not got replies from either. I am assuming that any 5th scale spitfire canopy will be about right and that it why i went for those two. Edited August 31, 2022 by Jon - Laser Engines Quote Link to comment Share on other sites More sharing options...
Nick Somerville Posted August 31, 2022 Share Posted August 31, 2022 59 minutes ago, Graham Davies 3 said: David, that is 'next level' modelling. Fantastic, and inspirational. Totally agree. Extraordinary level of detail. Very humbling. Quote Link to comment Share on other sites More sharing options...
extra slim Posted August 31, 2022 Share Posted August 31, 2022 One can only doth ones cap to the patience and skill. Thanks for sharing. Quote Link to comment Share on other sites More sharing options...
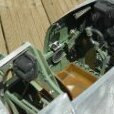
david tilbury Posted September 2, 2022 Author Share Posted September 2, 2022 Thanks Nick.....extra slim....:-).... Just some more photos of the printed parts.....lithoplate panels etc Quote Link to comment Share on other sites More sharing options...
david tilbury Posted September 19, 2022 Author Share Posted September 19, 2022 new ply motor plate fitted yesterday in front of the original engine bulkhead......just fitted the Hacker motor and spinner plate all lines up.....will remove the old bulkhead once the new motor plate is glued in position.....batteries will fit just behind new plate so old has to go....made a cardboard template first before making the new ply version 2 Quote Link to comment Share on other sites More sharing options...
david tilbury Posted September 28, 2022 Author Share Posted September 28, 2022 While i'm thinking how to make a battery bracket, the batteries need to be inserted vertically .....i pulled everything out of a number of boxes that i'd stored away yesterday and made a start on the inner details of the main doors. When i offered the wheel up i discovered it should have been at least 3 mm thinner once in the up position the door outer skin stood proud.....so made some more wheels this time with 3 spokes as i'd found a photo of the Mk xiv with them. I found i never had the hub cap for this wheel so did the CAD last night.....should have the parts later today.......also the main locking nut is semi recessed unlike the 4 spoke..... The new thinner wheel fits perfect... Quote Link to comment Share on other sites More sharing options...
david tilbury Posted October 15, 2022 Author Share Posted October 15, 2022 So been head scratching over the inner doors....made a couple but wasn't happy with them.....not sure why it took so long to figure out one of the scissor link positions was out.....the lower one is correct but the upper one needs replacing. Cut the old ones off the oleo (if it needs putting back this could be easily done) made up some new ali fixing blocks and glued them into place.......the scissor links are not functional just cosmetic so as long as the new ones work which they do everything should be ok.... Made some new scissors.....once the hysol is dry tomorrow i'll try and fit the new door inners, things should fit much better now. 4 Quote Link to comment Share on other sites More sharing options...
david tilbury Posted October 16, 2022 Author Share Posted October 16, 2022 Much better, under compression no stress on the scissor links. Quote Link to comment Share on other sites More sharing options...
david tilbury Posted October 19, 2022 Author Share Posted October 19, 2022 3 Quote Link to comment Share on other sites More sharing options...
david tilbury Posted November 7, 2022 Author Share Posted November 7, 2022 More on the Spitfire ......having watched the first of the series Warbird Workshop on More4 on TV last week which was amazingly about restoring RM927 Mk xiv at Sywell......my perfect colour scheme for my YA Spitty.....there are a few things to change and add but it's pretty much workable......so made a start today developing the CAD for the camera covers, some small detail to add but pretty much there......will need opposites printing, this one shows the forward hatch position which is not on the opposite side. It was pretty much an eyeball approach as no drawing available, i did take the section off the fuselage first before creating the CAD so i know it fits. 4 Quote Link to comment Share on other sites More sharing options...
david tilbury Posted November 10, 2022 Author Share Posted November 10, 2022 New parts printed and fit well.....made some clear windows just need the outer bezels making, will turn these from model lab board later. New cannons complete.....just need some screw heads fitting and making good with the wing, these are a lot shorter than the taper barrels i had originally so i might secure them to the wing....will see The non panel camera lens cover needs gluing together as it's in one piece on the full size.... More to follow.... Cheers 1 Quote Link to comment Share on other sites More sharing options...
Paul De Tourtoulon Posted November 10, 2022 Share Posted November 10, 2022 Yes the Warbird Workshop program was good. Quote Link to comment Share on other sites More sharing options...
david tilbury Posted November 14, 2022 Author Share Posted November 14, 2022 We have holes..... 2 Quote Link to comment Share on other sites More sharing options...
david tilbury Posted November 14, 2022 Author Share Posted November 14, 2022 2 Quote Link to comment Share on other sites More sharing options...
david tilbury Posted November 22, 2022 Author Share Posted November 22, 2022 Been drawing up the nomenclature for the Spitfire ready to make the paint masks....also had to make a set of 4 spoke wheels as the new scheme has 4....will keep the 3 spoke for my BT Spitty.....finished the cannons......had to move the top wing blisters and make some new shell ejector holes on the underside of the wing....will cover my new rudder today with solatex... cheers 1 Quote Link to comment Share on other sites More sharing options...
david tilbury Posted November 23, 2022 Author Share Posted November 23, 2022 New rudder nearly finished just the light fairing to do......:-) 2 Quote Link to comment Share on other sites More sharing options...
Martian Posted December 7, 2022 Share Posted December 7, 2022 Fantastic work David you have inspired me to crack on with my Tigercat although nowhere near in the same league. Quote Link to comment Share on other sites More sharing options...
david tilbury Posted January 12, 2023 Author Share Posted January 12, 2023 Thanks Martian......nice subject the Tigger cat....:-).....loved seeing the one at Duxford many moons ago.... Cheers Quote Link to comment Share on other sites More sharing options...
david tilbury Posted January 12, 2023 Author Share Posted January 12, 2023 So waiting upon the fine weather to start....no chance at the moment to start painting.....so pulled/blew the dust off another project......will post a new thread rather than on here....be back soon when the weather picks up Quote Link to comment Share on other sites More sharing options...
david tilbury Posted April 24, 2023 Author Share Posted April 24, 2023 (edited) Hopefully over the next couple of weeks i will have this finished......bought a very good paint spraying mask today so i can spray my enamels in the workshop......will post a picture when it arrives......so spent the day making my masks... Most are done....had to adjust the 'X' and serial number to get close to the full size images i have.....also the wing roundal has a thicker white band than the outer yellow where as the underside wing and fuz doesn't.....so made the changes. Edited April 24, 2023 by david tilbury Quote Link to comment Share on other sites More sharing options...
david tilbury Posted May 3, 2023 Author Share Posted May 3, 2023 (edited) Made a start today on painting.... Used a sponge to paint the yellow and white rather than my spray gun as it covers better......Brian Wood who i spoke to today said about spraying the complete roundel white first then the yellow and white come up better....but i'll leave it as it is......once dry tomorrow i'll carry on with the blue and red... Also made some more wheels as i sold the originals, i did notice a red text on the full size.....LOCATE HERE....so this was added with a mask.....the smallest i've gone on my mask cutter........the creep marks are also white not yellow or red....we have a big problem here in the UK at the moment.....supplies from China are very limited....foam wheels included.... Edited May 3, 2023 by david tilbury Quote Link to comment Share on other sites More sharing options...

Recommended Posts
Join the conversation
You can post now and register later. If you have an account, sign in now to post with your account.
Note: Your post will require moderator approval before it will be visible.