gypsy_shoals_farm_hand_holding_emu_eggs_for_sale

How To Incubate & Hatch Emu Eggs

Hatch emu eggs successfully with our step-by-step guide. Learn to care for emu chicks from incubation to hatching. Expert tips for beginners on how to hatch emu eggs.


  • The incubation period for emu eggs is 50 days..


Subscribe

To join our mailing list and never miss an update!

Are you fascinated by the exotic world of emus and eager to experience the miracle of life firsthand? Incubating emu eggs can be a rewarding and educational experience.


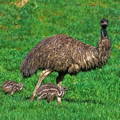
Emus, native to Australia, are large flightless birds known for their distinctive appearance and fascinating behaviors. If you're ready to embark on the journey of hatching emu eggs, here's a step-by-step guide to help you through the process.

1. GATHER YOUR SUPPLIES

Before you begin incubating emu eggs, it's essential to gather all the necessary supplies. You will need:


1. An incubator: Choose a reliable egg incubator with temperature and humidity controls.

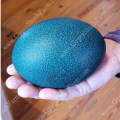
2. Fertile emu eggs: Obtain fresh, fertile emu eggs from a reputable source.

3. Thermometer and hygrometer: These tools will help you monitor the temperature and humidity levels inside the incubator.

4. Egg turner (optional): An egg turner automates the process of rotating the eggs, but it's not essential.

tabletop_incubator_dome_lid_emu_hatching_eggs

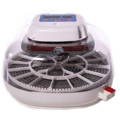
2. SET UP THE INCUBATOR

If you are not hatching emu eggs in a commercial cabinet incubator, you will need a tabletop model that has a dome lid large enough to accommodate an emu egg. The average emu egg weighs 650 grams so you need to make sure you can close the lid securely despite the large size of the egg.


Place the incubator in a suitable location away from direct sunlight and drafts. Set the temperature to 97.5 degrees Fahrenheit and humidity level at 35% for emu eggs. It's crucial to ensure stable conditions inside the incubator throughout the incubation period.

3. prepare the emu eggs

Inspect each egg for cracks or abnormalities, and discard any damaged ones. If you're using an egg turner, place the eggs inside the incubator and secure them in the egg tray.


If not, position the eggs on their sides and mark one side of each egg with an "X" and the other side with an "O" using a pencil. This marking will help you rotate the eggs manually.

fertilized_emu_hatching_eggs_gypsy_shoals_farm

4. monitor temperature & humidity

Regular monitoring of the temperature and humidity levels inside the incubator is crucial for successful incubation. The stability of these conditions ensures the proper development of the emu embryos.


Use the thermometer and hygrometer provided with the incubator to check the temperature and humidity levels frequently, preferably at least twice a day.


Maintaining the temperature at 97.5 degrees Fahrenheit is essential. Fluctuations in temperature can adversely affect emu embryo development and hatchability.


If the temperature deviates from the desired range, adjust the settings of the incubator accordingly and observe the temperature closely to ensure it stabilizes.

Keep your feed containers sanitary with the roost-proof Poultry Pyramid®

Similarly, humidity levels play a vital role in the incubation process. Emu eggs require a humidity level of approximately 35 percent for successful development. Proper humidity prevents the eggs from drying out and helps the embryos develop properly within the egg. Use the hygrometer to monitor humidity levels and make adjustments to the incubator's settings as needed to maintain the desired humidity range.


Humidity inside the incubator is regulated by the amount of surface area the water has, not how much water is in the reservoir. If your humidity level is too high, try covering a portion of the reservoir with plastic wrap, controlling evaporation.


Likewise, if the humidity in your incubator is too low, add a sponge to the water reservoir to increase evaporation surface area and raise humidity levels.

emu_chicks_gypsy_shoals_farm

5. Monitor air flow circulation

Emu eggs release carbon dioxide as they are developing inside the incubator. A motorized fan and air flow vents on your incubator model are crucial to exchanging this CO2 with oxygen outside the incubator. If this is not possible, you need to open the incubator several times a day to allow this air exchange manually.

Do not open the incubator (or hatcher if you are using commercial equipment) after you go into the lock down period, which is explained later in this article. Reason being, after the emu chick has begun the pipping and unzipping process, a release of humidity out of the incubator may cause the sac to dry up and shrink wrap your chick inside the egg. You should spray the eggs with a light spritz of water if you have to open the incubator after the eggs have started pipping to replace the humidity that has escaped.
gypsy_shoals_farm_emu_chicks_for_sale

6. Turn the Eggs

If you aren’t using an egg turner, you'll need to manually turn the emu eggs at least three to five times a day to ensure proper embryo development.

Gently rotate each egg 180 degrees, switching between the "X" and "O" markings. Be gentle and slow when handling the eggs to avoid damage to the developing embryos.

Trending Articles

Honey Gorgonzola Baguette Bites
HONEY GORGONZOLA BAGUETTE BITES Servings 12 Prep Time 5 min. Cook Time 8 min. Experience...


Sweet and Savory Greek Goat Cheese Stuffed Potato Bites
SWEET & SAVORY GREEK GOAT CHEESE STUFFED POTATO BITES Servings 24 Prep Time 20 min....


Korean Beef and Cucumber Appetizer
KOREAN BEEF & CUCUMBER BITES Servings 10 Prep Time 15 min. Cook Time 15 min....


7. Maintain optimal conditions

Continue to monitor and maintain the temperature and humidity levels inside the incubator throughout the entire incubation period, which typically lasts around 50 to 55 days for emu eggs. Make any necessary adjustments to ensure optimal conditions for embryo development.

Regularly check the water reservoirs or trays within the incubator to ensure an adequate supply of water for maintaining humidity levels. Refill the water as needed to prevent it from running dry, especially during the later stages of incubation when humidity requirements may increase slightly.

In addition to monitoring temperature and humidity, it's essential to observe the condition of the emu eggs periodically. Remove any emu eggs that show signs of damage or contamination, as these can pose a risk to the developing embryos and other eggs in the incubator.
emu_chicks_exploring_backyard_gypsy_shoals_farm

8. Prepare For Hatching

The last 10 days of the incubation period are called the “lock-down period”. Before hatching, the emu chicks needs time to situate themselves in the correct position inside the egg and prepare to begin unzipping the egg shell.

Stop turning the eggs on Day 40 of the incubation period and handle the emu eggs as little as possible from this point forward. If you are using a commercial incubator with separate hatcher, this is the day you want to move the eggs into the hatching cabinet. Otherwise, simply turn off the egg turner if you are incubating and hatching in one tabletop poultry incubator.

It is worth nothing, emu eggs do not require an increase in humidity to hatch, like chickens. Maintain 35% humidity through the lock-down period.
three_day_old_emu_chicks_hatching_eggs_gypsy_shoals_farm

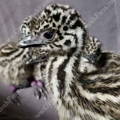
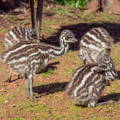
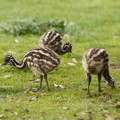
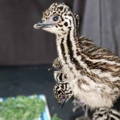
9. Welcome the Hatchlings

During the lock-down period, you may hear chirping sounds coming from inside the eggs as the hatchlings begin to break through the shell. Avoid opening the incubator during this time to prevent disrupting the hatching process.

Wait until the emu chick hatchling is fully dry before transferring it to the brooder. Emu chicks have long legs right from the start and it is important not to leave the dry chicks in the incubator for more than 18 hours to avoid leg, ankle and feet issues.
male_emu_with_brood_of_chicks

10. Caring For emu Chicks

Provide the newly hatched emus with fresh water and a non-medicated poultry chick starter feed. Before hatching, your chicks ingested the contents of the egg sac to give them energy to break out of the egg. Their stomachs are full so do not be alarmed if they don’t eat much the first few days.

When it is time to eat and drink, emus are different than chickens. Emus scoop to eat and drink. Therefore, use dishes or hanging troughs that allow them to do so, but prevent them from drowning.
emu_chicks_eating_kale_in_brooder

Offering finely diced raw kale sprinkled on top of their food will entice them to explore their surroundings and figure out where their food is located. Similarly, a small rubber duck toy in their water bowl will peak curiosity and they will learn where their water is.

Keep the brooder box clean and maintain a warm temperature of around 90 to 95 degrees Fahrenheit (32 to 35 degrees Celsius) for the first few weeks. Emus cannot regulate their own body temperature until feathers emerge and replace the down.

As the emu chicks grow, gradually reduce the temperature until they are fully feathered and can regulate their body temperature. To avoid a fire hazard, use radiant heat sources instead of heat lamps.
papa_male_emu_with_his_chicks

📌EMU HATCHING CHEAT SHEET

• Incubation Time: 50-60 days
• Incubator Temperature: 97.5F
• Incubator Humidity: 30-35%
• Turning: 3-4 times per day at a ½ turn each time
• Lockdown Date: Day 40
• Lockdown Temperature: 97.5F (no change)
• Lockdown Humidity: 30-35% (no change)
• Turning: Do NOT turn eggs during lockdown

In conclusion, incubating emu eggs is a relatively simple process if temperature, humidity, air flow and regular egg-turning are monitored. By following these step-by-step instructions and providing the proper care and environment, you can successfully hatch and raise healthy emu chicks.

Trending Products


Copyright©2024 All rights reserved. We love to have you share our article as long as you include a direct link to this page. This article or any portion thereof , including all images, may not be reproduced or used in any manner whatsoever without the express written permission of Gypsy Shoals Farm.