Firstly, I am appropriately chastened by the span of time that has passed since my last post. #chastened.
I have 2 new Victorian dresses and 1 new costume to show you…. Forgiven??
This post is focused on the Seven of Nine (Portrayed by Jeri Ryan, and possibly the best character arc, ever.) costume I built for Halloween last year. Unfortunately, there were precisely zero decent pictures of it from the evening. When I wore it again, at Concinnity, I took advantage of a photographer on location (well, resistance WAS futile) and had some better pictures taken. In conjunction with some in progress images, we have enough fuel for a blog!
Now, this fabric was purchased probably 15 years ago and has been in my sewing room ever since, as I thought wistfully, “One day, I will lose weight and make a 7 of 9 costume”. A year ago I finally DID something about my weight (see my post) and last October I pulled the fabric out from storage… In conjunction with a few hi-res pictures online, I was off & running!
The parts comprising this costume include the bodysuit with incorporated shoes (heels, for the oh-so-practical borg), a corset underneath with “borg bone” exoskeleton, a padded bra (may not be necessary for everyone, but even Jeri had … help), and of course the “borg” prosthetics on her face and hand. Above the left eye is an “occipital ocular implant”, a small nano-something is in front of the left ear, and a glove-like series of silver “nanoprobes” stretching over her left hand and fingers. Picture time:

The original metallic suit was, according to actress Jeri Ryan, the most uncomfortable by far. My guess is, that was due to the unforgiving nature of the fabric. Later spandex knit costumes were much more comfortable while still being skintight.

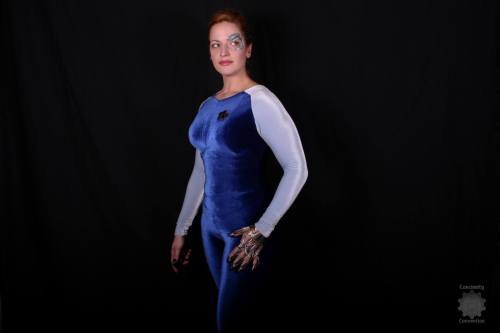
This is the costume I re-created, working with colors and fabrics available. I ended up using a spandex velour in two shades of blue, though you can see that the original fabrics were gray and blue ribbed knits with metallic woven in.


These are a couple decent images of the glove. Further details include the communicator insignia, the tri-corder she frequently carries, and the look (make-up and hairstyle).
Prosthetics:
I purchased the facial prosthetics from ebay. They were made of silicone, and far too thick to be of any use. Don’t buy them in silicone. To make the best of the situation, I thought I could use the silicone implants as a mold base to make my own from latex. And I learned something about myself- I have the patience to hand bead a forepart, but I have no desire to make something that is meant to be a replica, and which I could purchase at a reasonable price. I ended up finding the two pieces online in a SFX store. As it turned out I had to paint them myself, so they ended up having my own personal stamp anyway. I tried a few different types of paint, and much of it didn’t work (even theatrical metallic face paint with a “glue” additive. The most effective was actually metallic eye shadow. Spirit gum works just fine to hold the prosthetics on for a day.
The glove was another story, because no-one makes it (to my knowledge). I found this blog post very useful, but still went in another direction. I purchased a yellow rubber kitchen glove and drew the outline for the glove, according to the many pictures available online. I then painted on about 8 layers of liquid latex, following the lines I drew and allowing drying time between each layer, to create a three dimensional look. Then I used an exacto knife to cut out the gloves, leaving the fingertips on and cutting about an inch down, leaving a thimble-like pocket (because you need some way to keep them on your fingers). I also left a strip at the wrist and across the hand just below the fingers- both of these strips are authentic to the original and, I believe, increase stability. I then painted it with black multi-surface paint and dry-brushed it with metallic silver and gold. I did not glue the glove to my hand, and it was acceptable. After a few wearings I have found the paint is cracking & I may need to come up with a new design, but I think version 2.0 will go much faster now that I’ve done the first one.
The Corset:
I’ll admit, I somewhat cheated and did not make this from scratch… I took a cheap corset I had laying around (like one does), and cut it to be an under-bust style. I replaced the plastic boning with steel (told you it was cheap!), and replaced the grommets with a separating zipper. I could do this because the corset was too big, allowing me to find a good snug fit and then insert the zipper at a point before the grommets began. BUT- the important part is to have an under-bust corset that fits- it should be snug in the waist but not pooching you out at the top or bottom… this is not a waist-training corset! If you can avoid it, don’t use one with plastic boning- plastic warps when it is warmed (by your body) and then retains that warped shape when it cools. Once I had the fit determined and the zipper in, I used large piping cord and whip-stitched it along the corset horizontally (marked in chalk) to create “borg bones”. Voila.
The Bra:
This wasn’t too- I bought a big full coverage bra from a discount store, making sure it had pockets for push-up pads. Then (after adjusting band and straps) I started stuffing. After sending a somewhat hilarious tank top picture to my husband, I took out one of the pads. I think it was a good call. Then I whip-stitched everything into place with sturdy thread.
*Interesting note- Jeri Ryan’s costume actually consisted of a “merry widow” style bodysuit, incorporating both the bra and corset-like piece in one. Probably helped create a smooth line from top to bottom.
The Bodysuit:
This is the really important piece- it’s 80% of the costume, really. Now, one plus to working with stretch fabric: there’s a lot of give, literally. It’s pretty easy to edit your leg or your waistline… the exceptions here are areas like the crotch. Be careful there, or you’ll end up with the dreaded camel-toe. Another touchy area is the zipper. I went with an invisible zipper, and I put in knit interfacing to help avoid weird pulls and bumps. I put it in after getting weird pulls and bumps and seam-ripping the whole thing, of course. Learn from my mistakes… use interfacing and pin religiously!
So, from the starting point, there’s the top and the bottom, joined at the hip- I lined up the bottom “borg bone” of the corset to match with the hip seam. The zipper from neck to tailbone is how you get in and out of this thing.
I took apart a really close fitting pair of yoga pants to get a baseline for the leg pattern. The seam on the leg is on the inside, so I wanted to keep it as authentic as possible. When you have a mostly monochromatic bodysuit, seams stand out. I left a little extra at the hip to play with, and plenty at the foot/ankle area because I still had the shoes to attach! *Make sure you give yourself at least as many inches as the top of your foot from ankle to toes!

Hip line at left, LOTS of room for the shoe at right.
The shoes in the original costume have a stacked wooden heel. I was able to find a pair of heels that matched the silhouette pretty closely, covered in brown “suede” down to the heel. This served the second purpose of giving more surface area for the fabric glue to grab onto when I eventually glued the bodysuit fabric to the shoes. This required much pinning and cursing, as I was wearing the shoes and bodysuit leggings. After gluing, an exacto knife came in handy again to get a nice, clean edge. * Make the ankle as tight as you like, but… you DO have to get your foot in there.

The top part of the bodysuit was particularly challenging because the front is made up of 5 pieces- two sections for each breast, plus the single piece beneath them, with a pointed bottom to mach the long, zippered back piece. I made a pattern and mocked it up with swimsuit fabric scraps I had lying around. I made the mock up short sleeved because the length is really secondary, and not necessary in this mock up.
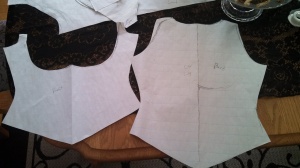
Front and back.

“Inner boob” and “outer boob”. In my defense, I refrained from calling it “side boob”.
The sleeves were a challenge also, because (I had no idea) there are several types of raglan sleeves. What I did was cut away from the paper pattern for the chest and upper back, and added the ( I hoped) right shape to the sleeve pattern block. I ended up stitching the angle with more of an angular bend, but it was just about on target…. again, the stretch fabric allowed flexibility in certain aspects.

Sleeve with the addition of fabric for the raglan style.

Cutting out the sleeves… dont mess up!!
The mock up looked pretty good, but resulted- again- in a confused husband when I sent him progress pics.


I explained it was scrap fabric, not a new, funky “Seven of Nine”. I finished cutting out the good fabric, sewed it together, made some adjustments and there it was! I did double stitch every seam, and zigzag stitch them to finish it… so even if a seam rips, I have a backup plan to preserve my modesty 😉
I bought a magnetic Voyager communicator insignia online (I think it was at Think Geek) and, surprisingly, my old Razr made a great tricorder!

So very futuristic!
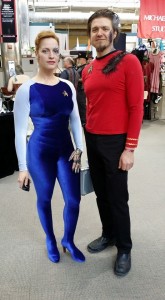
Now, without further ado, some images of the finished product at Concinnity (with my darling Red-Shirt) and one from the costume contest we won on Halloween 2014.


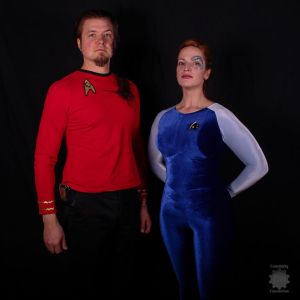 One of my favorites!

Next up, one of the two Victorian gowns, and sooner rather than later!

Thank you, this was very informative and enlightening! I love the finished product. Excellent work Laura. Who is that “hot” creature at your side?
Thank you for your kind words Linda! That “hot” creature is my husband… and after those phaser burns, he was very hot!
I’m impressed at the amount of effort you put into this. I had always thought Seven would look better in T’pol’s velour bodysuits than she did, and you kind of proved that concept right. Not to mention the fact that you yourself look fantastic in your creation. Your husband is a lucky man.
Thank you for your kind words- it IS a lot of work, but I really enjoy the process as well as the result (although some processes are so much easier than others!). I’m glad you enjoyed the post 🙂
Thank you for the pictures of the patterns. Your sewing is fantabulous ☺️
Thank you so much, and I hope the patterns can be of use! I’ll be going into more detail on this costume and working with 4-way stretch, as well as a plethora of other costuming techniques, in my upcoming second book! https://www.kickstarter.com/projects/victoriancollection/the-halloween-collection-costume-and-cosplay-techniques?ref=clipboard-prelaunch