


How to Remove Background of an Image Using GIMP (4 Easy Ways)
Did you know you can remove the background of an image using the free image editor GIMP? Here are the 4 easiest ways to do it, as well as some other tips.
GIMP | Learn | Photography Guides | By Ana Mireles
Shotkit may earn a commission on affiliate links. Learn more.
Did you know there are several ways to remove an image background in GIMP?
In this guide, we’ll show you 4 ways to create a transparent background in GIMP with step-by-step instructions.
GIMP is a popular free online photo editing app, but it does have its limitations – while anyone can remove an image background in GIMP, it’s still a bit fiddly and time-consuming.
(Some people prefer Photoshop over GIMP, but it requires an Adobe subscription which can become pricey.)
Head to the bottom of this guide to see an alternative way to remove an image background using a powerful new app, but for now, let’s see how to remove an image background using GIMP.
4 Ways to Remove an Image Background with GIMP
1. First Method: Use the Fuzzy Select Tool
The Fuzzy Select tool (often called the magic wand tool because of its icon) works by selecting pixels with similar colors to those you’re sampling in a contiguous area.
This method is one of the easiest ones you can find to remove background using GIMP, and it’s best if there’s enough difference in color between the background and the foreground.
Let’s do the photo editing with GIMP step by step.
Step 1: Add an Alpha Channel
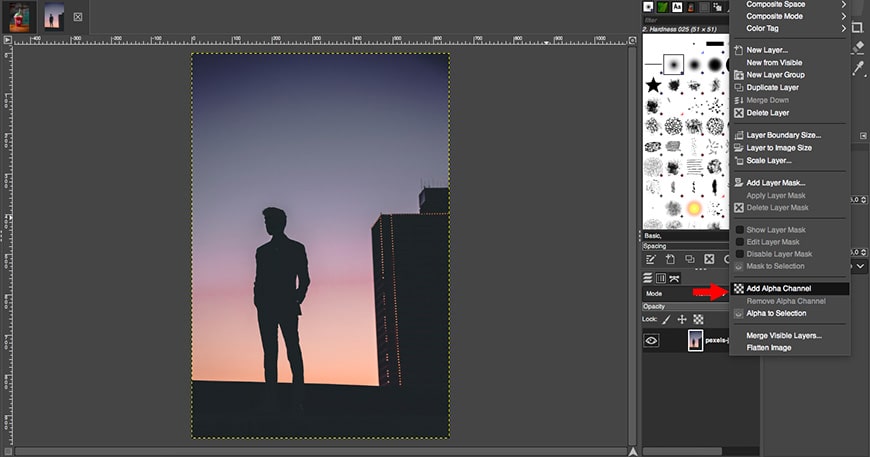
Photo credit: Jeswin Thomas
Start by right-clicking on your image layer to open its menu. There, click Add Alpha Channel – this will allow you to leave a transparent background once you delete the unwanted background.
Step 2: Enable the Fuzzy Select Tool
Next, activate the Fuzzy Select Tool. You can do this by clicking on its icon on the toolbar (it’s the one that looks like a magic wand). Alternatively, you can use the keyboard shortcut by pressing the U key.
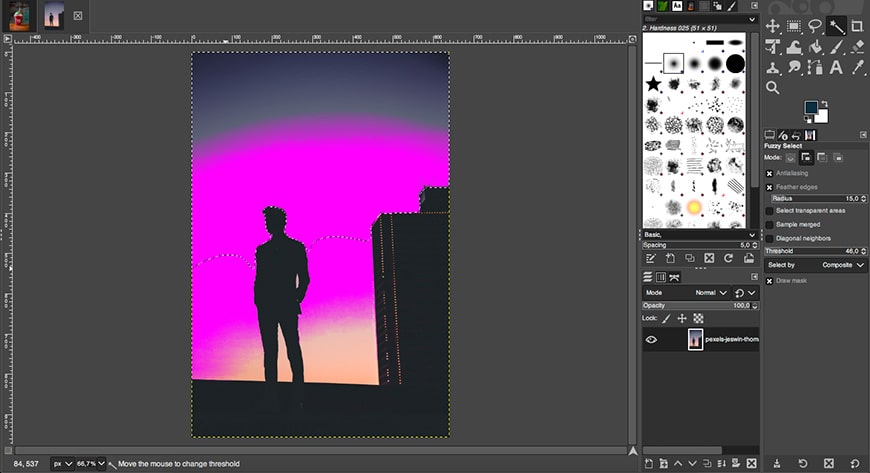
Step 3: Adjust the Fuzzy Select Tool settings
On the tool options panel, you’ll find different settings that allow you to tweak how the Fuzzy Select tool works. Make sure you enable Antialiasing and Draw Mask – this last one allows for a color overlay that shows you what’s being selected.
Also, tick the Feathering option and select the Radius value depending on how much feathering you want.
Step 4: Make the selection
Click on the background, drag the cursor up or down, and check the overlay to see how the selection is going.
The starting point makes a big difference when using the Fuzzy Select tool. If it’s not behaving as expected, try clearing the selection and starting over by clicking on a different point.
You can also make the selection in parts. Click and drag the tool until it starts to select something you don’t want. Then, slowly turn back until you reach the last point where you are satisfied, then let go.
Now, click again close to the edge of the previous selection and carry on. I found this is the most accurate way to select the entire background. Of course, it depends on each image and how many color gradients are in the background.
How Much Do You REALLY Know About Photography?! 🤔
Test your photography knowledge with this quick quiz!
See how much you really know about photography...

See also: how to crop in GIMP
Step 5: Fine-tune the selection
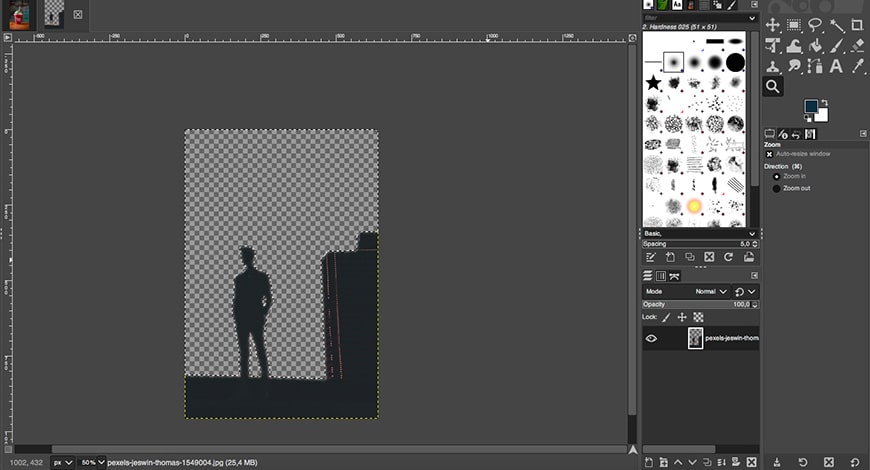
Since the Fuzzy Select tool works only on areas that are touching, you might find that parts of the background remain unselected.
For example, check the space between the legs or arms if your subject is a person (like in the above image).
Step 6: Delete background
Now press Delete to remove the background.
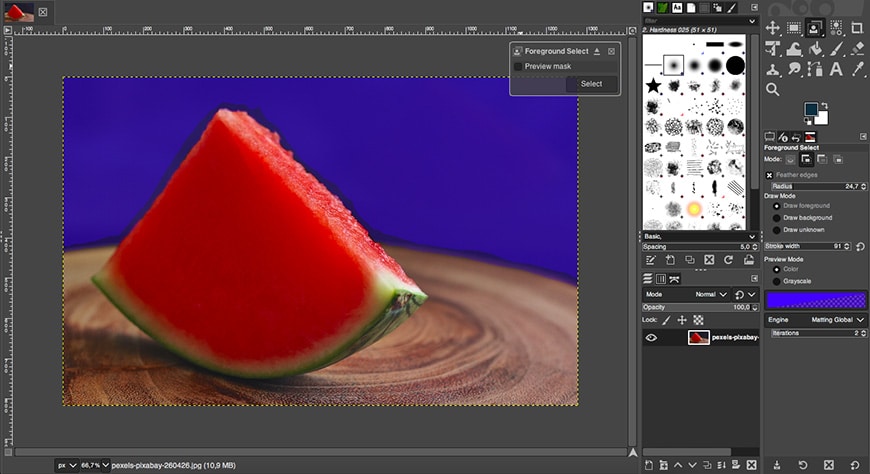
2. Second Method: Foreground Select Tool
This tool is dedicated to background removal or alteration, asking for little input from the user.
Step 1: Add an Alpha Channel
If you want to have your image background transparent, you need an alpha channel. You’ll find this option by right-clicking on the image layer.
Step 2: Enable the Foreground Select tool
Enable the Foreground Select tool by clicking on its icon in the toolbox. There isn’t a keyboard shortcut for it.
Make sure you set the Engine to Matting Global on the options panel because Matting Levin seems to have a bug in many GIMP versions.
Once you activate it, you’ll notice your cursor changes into the icon of the Lasso tool.
Step 2: Outline the foreground
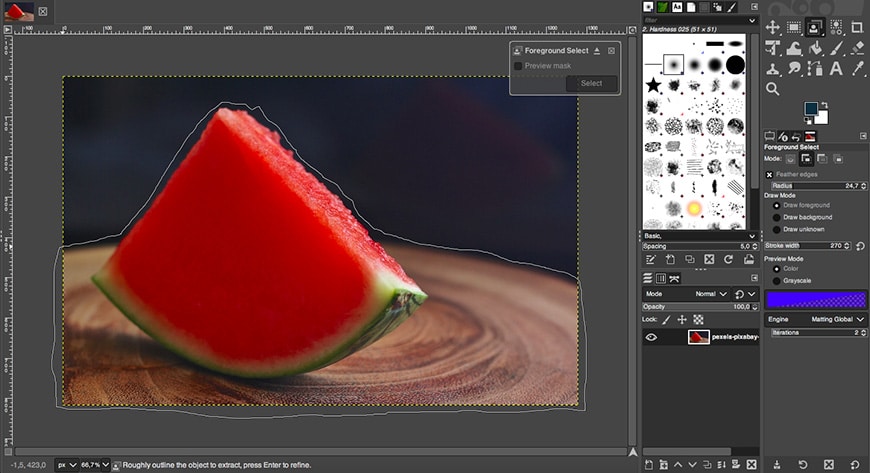
Photo credit: Pixabay
The first step of the Foreground selection uses the Free Select tool – that’s why the cursor has the lasso icon now. So, you use it in the same way.
Click on a starting point and draw a rough outline of the foreground – you don’t have to worry about precision here. Keep drawing until you reach the starting point again.
Then, click enter. Now you’ll notice that your image is divided into a dark blue area in the background and a light blue area in the foreground.
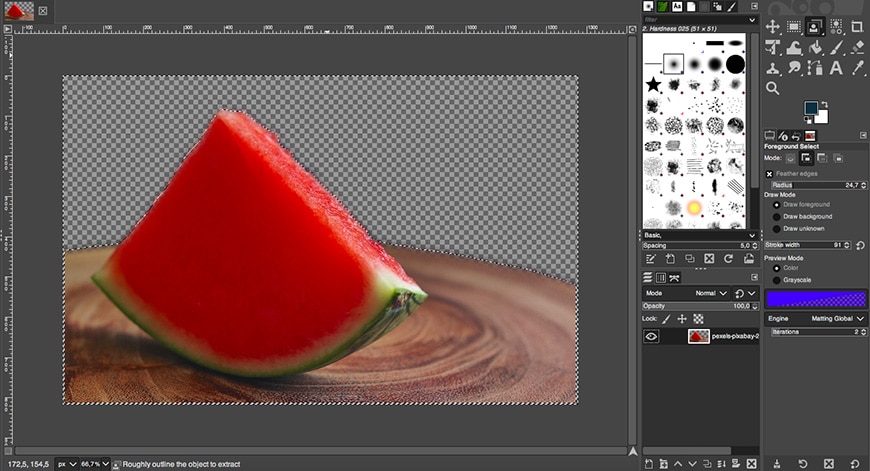
Step 3: Draw foreground
Notice how the cursor changed the icon; now it’s the one from the Brush tool. This is because you now have to manually brush the entire subject.
Again, it doesn’t need to be super precise – but you should adjust the brush size to avoid painting over the background when you’re close to the edges.
You can enable and disable the preview on the pop-up window to see how it looks. If you’re happy with the result, click Select.
Step 4: Invert the selection
Right now, you have selected your subject, but you need the background to be selected in order to remove it. So, go to the menu Select, and choose Invert.
Step 5: Remove background
That’s it. Simply press the Delete key to remove the entire image background.
3. Third Method: Select by Color tool
The Select by Color tool is really useful if you have an image with a single color background without many tone variations. Make sure that the subject doesn’t have the same color, though.
Step 1: Add an Alpha Channel
Start by right-clicking on the layer and choosing Add Alpha Channel from the menu. This will allow you to add transparency when you delete the background.
Step 2: Activate the Select by Color tool
Click on the icon of the Select by Color tool to enable it. You can also do this via the keyboard shortcut Shift + O.
Step 3: Adjust the Select by Color Tool settings
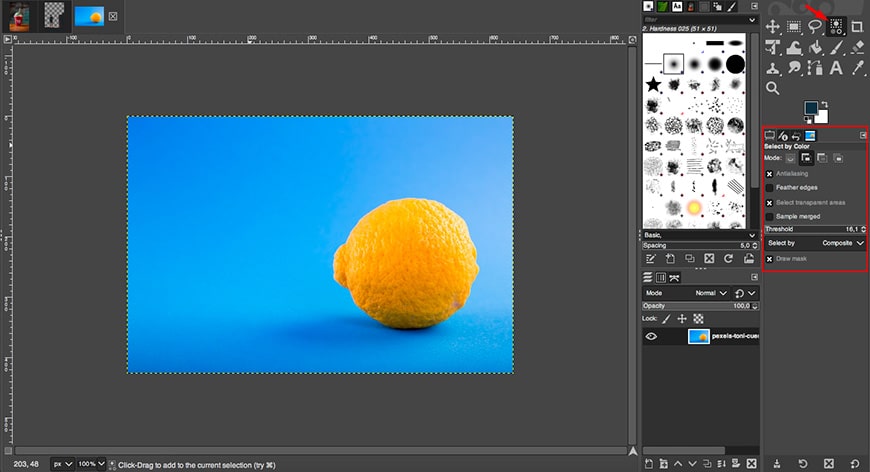
Photo credit: Toni Cuenca
Enable Antialiasing and Draw Mask (layer mask) in the tool’s options. If you want sharp edges, make sure you disable the option Feather Edges. Otherwise, leave it enabled.
Step 4: Select the color
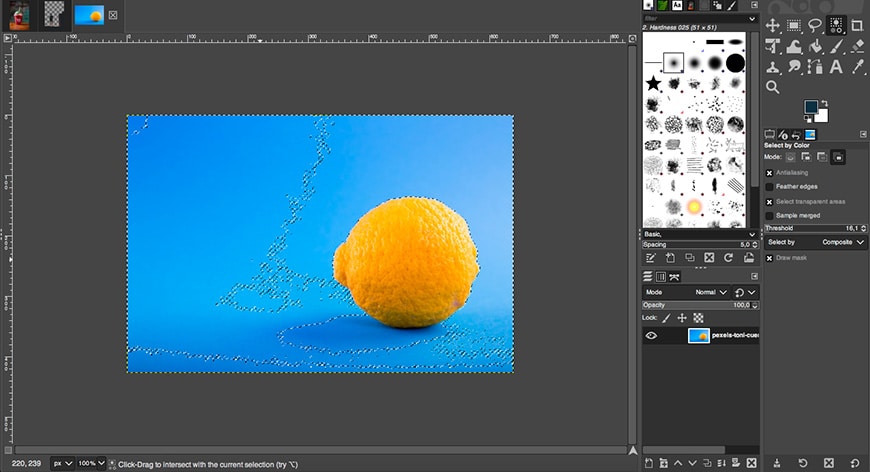
Now, simply click and hold anywhere in the background to select all the pixels with this color.
You can adjust the Threshold by scrolling up or down. This will allow for more or fewer variations from the primary color that you’ve selected.
Step 5: Remove background
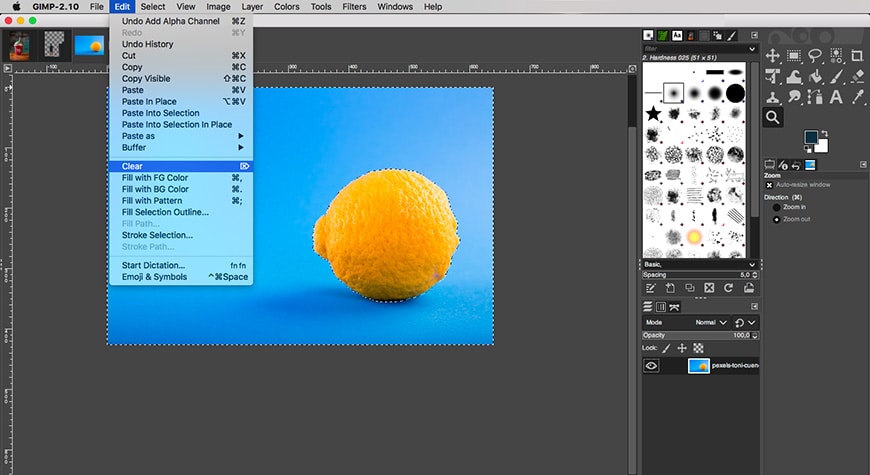
Once you have the selection, press the Delete key to remove the background. Alternatively, you can go to the menu Edit, Clear.
4. Fourth Method: Path tool
The final method I recommend to remove the background using GIMP is not the easiest, but it’s not complicated either – and it’s the most accurate. If you’re familiar with Adobe Photoshop, the Paths tool would be the equivalent of the Pen tool.
Step 1: Add an Alpha Channel
Like any method to remove background using GIMP, you need to add transparency information to the layer. So, right-click on it and select Add Alpha Channel.
Step 2: Enable the Path Tool
Click on the Path tool icon on the toolbox to activate it. You can also use the Keyboard shortcut by pressing the B key.
Step 3: Trace a path
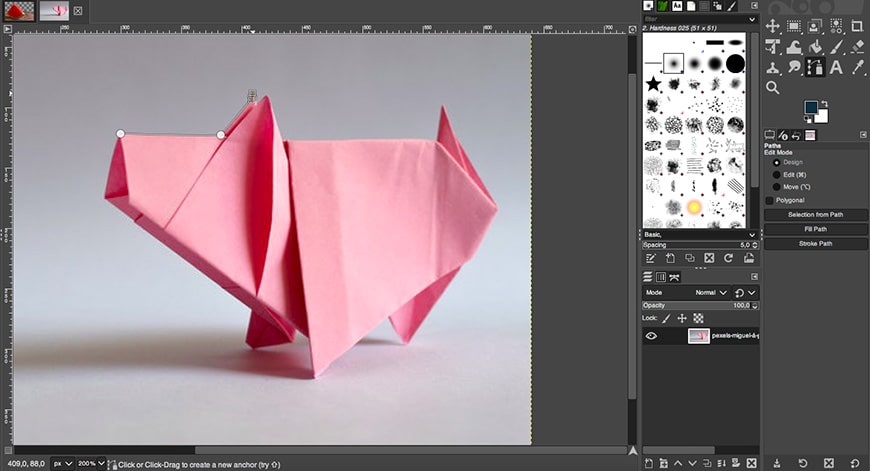
Photo Credit: Miguel á Padriñán
Click anywhere on the edge of your subject to create a starting point. Then, move forward and add another anchor point for the path – if you just click, you’ll have a straight line connecting both points, but if you click and drag, you’ll be able to curve it.
You’ll notice two handles coming out of the anchor point when you add a curved line. You can use those to find the perfect curvature to outline the subject more precisely.
Once you’re OK with a line and you want to continue tracing the path, simply click on the latest anchor point you added.
Keep on going until you reach the starting point again. To have smooth lines, add only the necessary anchor points – don’t add too many because that could create a jagged edge.
Step 4: Create selection from path
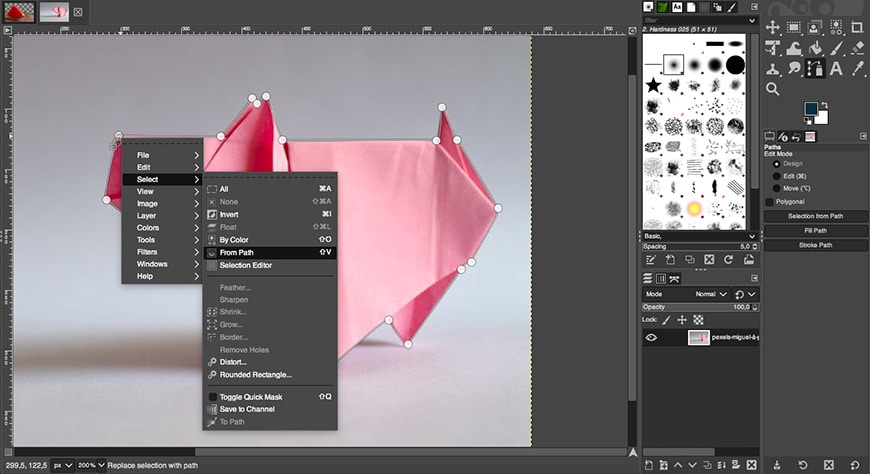
Now that you have a complete path right-click inside it to open the menu. Here, choose Select > From Path. You’ll notice that the anchor points’ lines are now marching ants. That indicates the selection.
Step 5: Invert the selection
Now invert the selection so that it’s the background and not the subject selected. You can right-click inside the selection and choose Select > Invert.
Step 6: Remove background
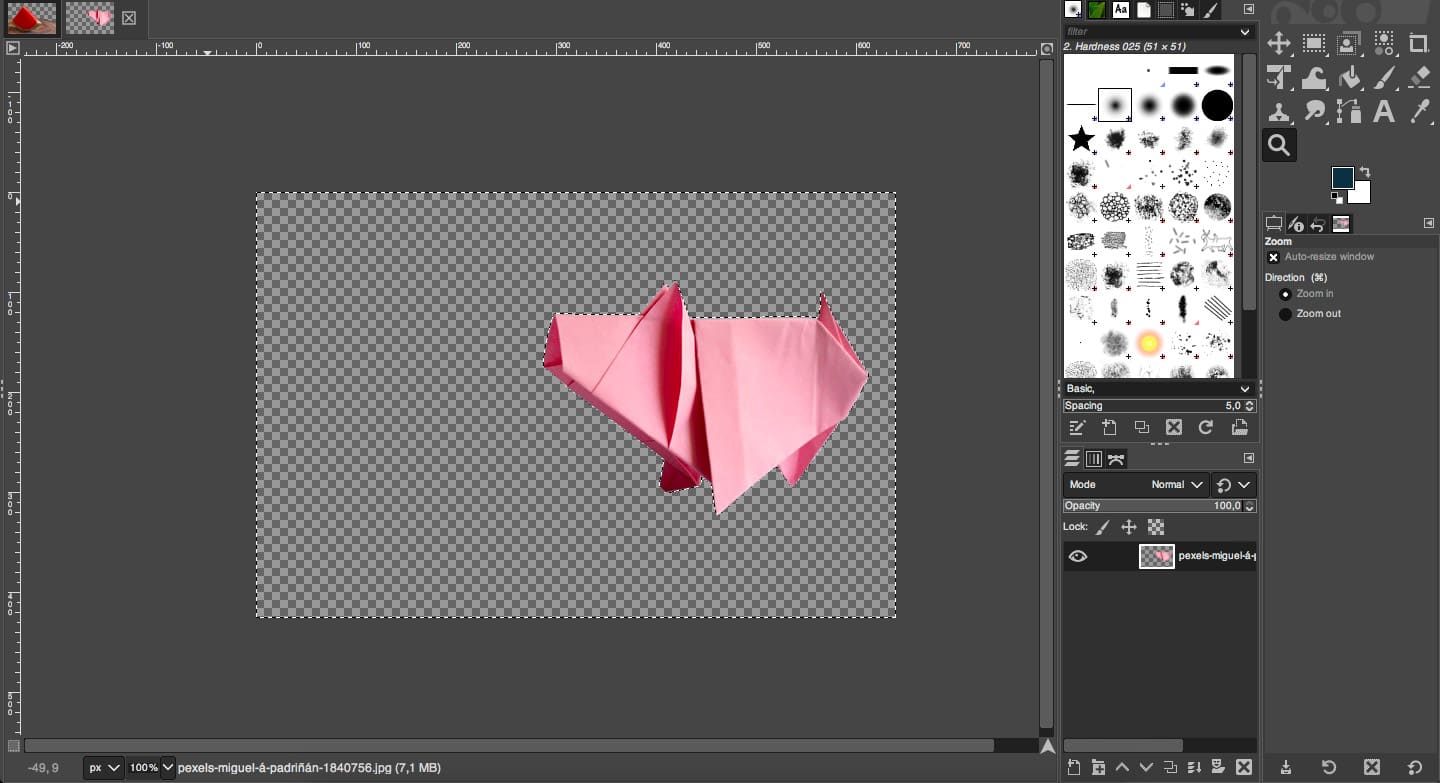
Now, press the Delete key to remove the background.
Quickest Way to Create a Transparent Background Without GIMP

Removing the background with Luminar Neo is easy and fast.
If you don’t want to fiddle around with layer masks or the path tool in the GNU image manipulation program (GIMP), there’s a much easier way to do it thanks to a software called Luminar Neo (review).
Here’s how to remove and swap an image background with Neo:
- Download Luminar Neo here (use code shotkit10neo to save $10)
- Look for the Portrait Background removal feature, which is located in the Edit tab under Layer Properties in the Masking tab.
- Choose Portrait Background from the submenu, and select the Remove option.
- After Neo removes the background, zoom in by pressing Ctrl + and check if you need to edit the fine details.
- Click the Refinements Brush dropdown menu, then use the different brushes to fine-tune the selection.
- Once you’re happy, click the Share tab and choose where to export your image as a transparent PNG file.
- Then you can import your image (with a transparent background) back into Neo, and use the Layers tool to add whatever new background you wish.
Aside from removing backgrounds, Luminar Neo has a host of other powerful tools that are simple and fun to use.
Luminar Neo has a 30-day money-back guarantee so be sure to give it a try today – get it here >>
Final Words
Replacing or removing the background are two of the most common actions in image retouching. That’s why GIMP – like any image editor – has many selection tools to help you do this task as quickly and precisely as possible.
You can remove a background using GIMP in many ways. Here, I explained four of them – but they aren’t the only ones. There’s also the Free Select tool, the Scissors tool, etc.
Once you remove the background, you can use the Bucket Fill tool to add a different color, or add a new background image. However, if you want to keep the transparency, you need to save your images in PNG format – otherwise, your image will be saved with a white background.
Now you know the essential tools I use to remove a background in GIMP, here’s how to remove the background in Photoshop.

Check out these 8 essential tools to help you succeed as a professional photographer.
Includes limited-time discounts.
 Luminar Neo Review (My Latest 2024 Test Results)
 Gimp vs Photoshop – Why Pay to Edit Your Photos in 2024?
 18 Best GIMP Plugins of 2024 + Installation Guide
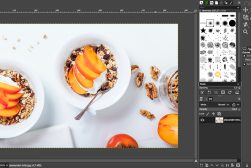 Photo Editing With GIMP: 10 Popular Techniques in 2024
 Luminar Neo vs Luminar AI: 6 Key Differences to Know in 2024

Ana Mireles is a Mexican researcher that specializes in photography and communications for the arts and culture sector.
👋 WELCOME TO SHOTKIT!

🔥 Popular NOW:
