I am a big believer that milestones need to be celebrated; birthdays, anniversaries, graduations, and general life events. If cake is involved, even better! I planned on doing something for the 5th anniversary of when I started my blog, but the date came and went before I even realised. Today marks 10 years from when I started out blogging the failsafe recipes that I was cooking for our family. So much has happened over that time, and although we are not strictly failsafe any more, I still like to create the odd recipe to share. I’m sorry it’s not as often as I used to.

My love for cooking and creating recipes is what originally sparked my idea for creating tasty and appealing recipes for the failsafe community. We were getting bored with the same old recipes that were floating around. Sure it’s a limited diet, when it comes to all the ingredients you are used to consuming… but there are actually a lot of ingredients that are available to eat while on the strict failsafe diet. They are out of the norm; like Brussels sprouts and saffron, and I wanted to explore new and exciting ways of cooking with them and presenting them on a plate, not just aimed at children, but adults as well.
When I look back at all my earlier recipes and photos when I started out I cringe, it is nice to see progress and hopefully improvements especially in the photography. I hope to slowly get the time to go over each of them, remake and re photograph. I have enjoyed discovering and learning about food photography and styling. Still so much more to discover. My first ever recipe was Vanilla Syrup, it is still a winner on waffles or pancakes. My favourite two recipes are “Lemon” Tempura Chicken – Failsafe and Pulled Chicken Sliders, both still get cooked regularly and are dishes that everyone in the house loves. I would love to know your favourites.
We started the failsafe diet when my son was 4, he is now 19! It has been a way of life for so long and made a huge difference in the way we could function “normally”. Very grateful for finding it and the sanity it brought to our family. Yes, it was tough and hard going being consistent, but knowing the difference we were making for our kids quality of life far outweighed any obstacle. So if you are just starting out in your failsafe journey, hang in there, it is worth it!
For those that have been along for my ride, the cookbook I was writing, is mostly finished and full of 80 beautiful new recipes with photos I am so proud of… sadly injuries, work and life just had a way of “getting in the way”. Then to top if off, quotes to be printed seemed so out of reach, we just couldn’t afford it so procrastination set in. One day, I hope to actually hold a hard copy of my book in my hands and be able to offer it for you to buy. I am still dreaming…
Another venture I have been working on that takes up a bit of time is At The Failsafe Table and the Failsafe Table Pinterest Page. The pinterest page is a one stop shop to find all your failsafe recipes for any occasion. I hope you are all aware of these and have subscribed to the newsletter or followed. The next next newsletter comes out tomorrow.
![]()
Anyway… today, we are celebrating with cake! A Tiramisu Cake with Mascarpone Icing. A little bit of delicious decadence. This cake was a massive hit with my husband, and he doesn’t usually eat cake! I got a really big thumbs up from the 3 kids, my folks and some of my son’s mates… so it must be kind of ok. I hope you enjoy it as much as we did. My daughter has requested it for her birthday cake next month.
You can make your own mascapone there is a recipe on Cookidoo. I have made it before and it’s really lovely, but I did cheat and buy from the supermarket this time. I successfully made this recipe with plain flour and with GF plain flour, just add a teaspoon of xanthan gum.
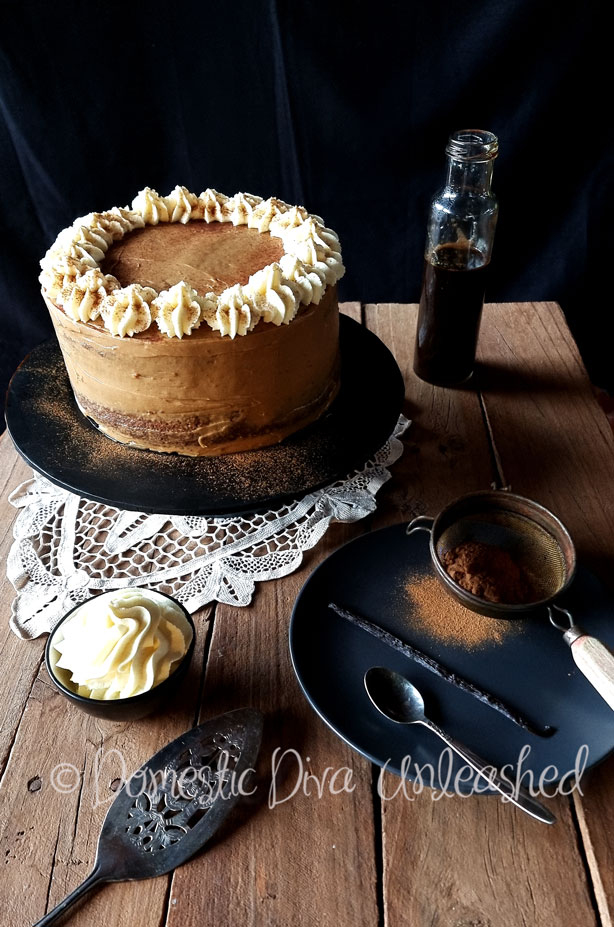

Tiramisu Cake with Mascarpone Icing
Ingredients
Decaf coffee syrup
- 3 tbsp decaf
- 80 g sugar
- 150 g water
Cake Mixture
- 220 g sugar
- 1 vanilla bean pod cut into 3 pieces
- 220 g unsalted butter, diced and softened or nuttelex
- 220 g plain flour / GF flour (add 1 tsp xanthan gum if using GF flour)
- 4 tsp baking powder
- ½ tsp bicarbonate of soda (baking soda)
- 1 tbsp decaf powder
- 1 tbsp carob powder
- 4 large eggs
- 3 tbsp milk
Mascarpone icing
- 240 g icing sugar
- 2 tbsp decaf powder
- 400 g mascarpone
To Assemble
- Whipped cream
- Dusting of carob powder
Instructions
Decaf coffee syrup
- Place all syrup ingredients into Thermomix bowl.
- Cook for 8 minutes / 90 deg / speed 2, with the MC off and basket on top to allow the steam to escape and syrup reduce.
- Allow to cool slightly and place into a sterilised bottle. Store in the fridge.
Cake Mixture
- Pre heat oven to 160 deg fan-forced. Lightly grease and line with baking paper 2 x 20 cm round cake tins.
- Weigh in sugar and add vanilla pod. Mill for 5 seconds / speed 9.
- Place the butter, flour, baking powder, bicarb, decaf and carob powder into the bowl. Mix 10 seconds / speed 4 to combine.
- Add the eggs and milk. Mix until just combined, 10 seconds / speed 3.
- Divide batter evenly between the two cake pans. Bake in the oven for approx. 30 minutes or until a skewer inserted comes out clean. (If making GF, I found it needed an extra 4-5 minutes in the oven).
- Allow to cool in tin for 10 minutes before placing on a wire rack to cool.
Mascarpone icing
- In a clean dry mixing bowl, mill sugar and decaf for 5 seconds / speed 9.
- Add mascarpone and mix for 5 seconds / speed 5.
To Assemble
- If necessary, using a bread knife or a cake leveller, trim top of the cakes to make level.
- Spread a small amount of the mascarpone icing in the middle of a cake plate (to stop the cake from sliding) and position one of the cakes onto the plate.
- Slowly pour some of the decaf syrup over the cake, do not saturate too much or it will go soggy.
- Using a spatula evenly spread the icing over the 1st cake layer making sure you go right to the edges.
- Place the second cake on the top of the 1st cake and centre evenly with the lower one.
- Slowly pour some more of the decaf syrup over the top cake.
- Spread icing evenly over the top of the cake and around the sides if you wish.
To assemble
- Pipe whipped cream around the edge of the cake and sprinkle with a light dusting of carob powder.
Notes


Thank you for creating & sharing this recipe. I can’t wait to make it for the next special occasion.