A Mechanic's Story: Basic Component Fatigue
In past articles we have explored the basics of Erosion, Corrosion, Fatigue and Overload. Our emphasis has been on creating an awareness and appreciation for the value of failed components, to any investigation.
In this article we are going to delve into Fatigue a little bit more (because it is the most common fracture pattern) and see how we can use an evidence-based, deductive logic process to determine what elements of Fatigue may have been at play. We are trying to create an intellectual curiosity within the front lines about 'making the call'...is it Fatigue, or some other fracture pattern?
Let's get started with, What is Fatigue?:
• Fatigue is failure (fracture) under repeated or fluctuating stresses which are well under the tensile strength of the material.
• The majority of pure mechanical failures are due to fatigue (80-90%)
We'll try to frame this up as a mythical shaft failure that is being investigated via RCA (or whatever you want to call your investigative approach). In this case we have a resulting pump failure (P-101) which has unexpectedly interrupted production. We observe at the failure scene, there is an obvious shaft failure (we see two separate pieces:-).
So at this point, our Event (E) is 'P-101 Recurring Failures'. P-101 has failed numerous times over the past year for different reasons, but we are most interested in this particular drive shaft failure.

All we know is the drive shaft is in two pieces and it shouldn't be. We are the first ones at the scene and we have the usual production pressure to get back up and running ASAP. However, personally, we are also interested in preventing this from happening again.
So we know the clues to such prevention are in the evidence at the scene (just like any other investigative occupation). We preserve the failed parts and prevent them from being thrown into the dumpsters. We bring the broken parts into the shop and stage them on a pallet. We notify the internal investigators (usually the engineers) that we have the failed parts and they can pick them up when convenient.
In the meantime, at this point, I'm a curious mechanic who attended a recent workshop on how to identify fracture patterns and I am curious if my analysis of the fractured surface will match that of the professional investigator.
So I look at the failed surfaces of the two pieces of the same shaft. I know from my training there are four (4) basic failure modes for fractured components:
- Erosion
- Corrosion
- Overload
- Fatigue

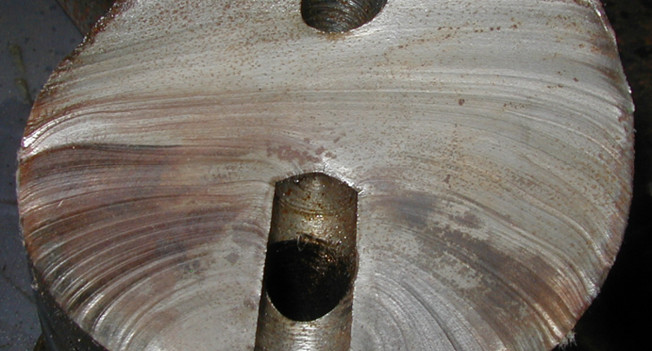
There are no smooth rubbing patterns that would indicate Erosion (uniform loss of metal). There is no pitting to provide evidence of Corrosion. There is not a rough, consistent pattern across the entire surface indicating an instantaneous Overload. However, there are these 'beach marks' that they talked about in class, indicating a cyclic pattern consistent with Fatigue. On this basis, I can rule out all but Fatigue. (Picture used with permission by Neville Sachs).
So now, using my logic tree that I am constructing on a paper towel in the shop, I ask 'How could I have a Fatigue fracture of the shaft?' I recall from my class there were two basic types:
- Mechanical
- Thermal

Note: the numbers in the lower left corner of my hypotheses, indicate Confidence Factors. With the evidence I have, how confident am I the hypotheses is absolutely true (5) or absolutely not true (0 - indicated with an 'X').
In my limited experience with analyzing failed surfaces, it looks primarily to be Mechanical Fatigue. I thought there might be a bit of temperature contribution due to the discoloration, but it turned out to just be dirt. So I crossed off what is not true and pursued what is true.
So my questioning is consistent as I drill down through the physics of the failure. "How could I have a Mechanical Fatigue failure of the shaft, resulting in an unexpected shutdown?" I had a memorable instructor in that fractology class, he used hundreds of parts to show us real failures (each with a story that stuck in my mind). At this point I recall him talking about the five (5) most damaging forces. They were:
- Tension
- Compression
- Torsion
- Bending
- Shear
My instructor used a lot of graphics as well to make the concepts come to life for me. Pictures work better for me than lots of words!
- Tension

2. Compression

3. Torsion

4. Bending

5. Shear

Judging from the beach mark progression pattern, I'm going to go with bending forces on this one. I was thinking there was some torsional forces going on but there was not the classic 45 degree fracture plane.
I also recall talk in my class about fracture origins, the cyclic progression of the beach marks (also called clam shell marks) and the Final Fracture Zone (FFZ) or instantaneous zone. The FFZ is when the crack propagated far enough to where the shaft could no longer take the load. So the FFZ is the rougher area showing an Overload pattern.

Depending on how large or small the FFZ is, will determine if the load was light or heavy.
I also learned the distance between the progression lines indicated the magnitude of the cyclic stresses


.So in my case, the fracture pattern I am seeing (as a novice), is a bending force going in the counter-clockwise position.
Fatigue Striations
I remember something about these things called 'fatigue striations'. Those are fancy words so I had to look it up in my course manual. Here is what it says:
"Fatigue striations are microscopic features on a fatigue fracture surface that identify one propagation cycle of a fatigue crack. They are not always present and can only be seen under a scanning electron microscope. Beach marks (also sometimes clam shell marks) are macroscopic fatigue features marking an interruption of some sort in the fatigue cracking progress. Both features are used to identify fatigue fractures. Fatigue striations can also be used to estimate number of cycles, etc."
Here is a pic they gave us in class to make the point. I can see the patterns they are talking about.

Ratchet Marks
Then they talked about these things called 'Ratchet Marks'. These are things I've see many times before on other failures, but never knew what they were. Ratchet marks are surface features which are perpendicular to the origin of the fatigue crack. They are formed by fatigue cracks overlapping one another. Ratchet marks “point” back to the failure origin and can be used to count the number of origination points. This is not evidenced on my failure, but here is a pic they showed me to to embed it in my mind.

So as I keep drawing on my paper towel to show my logic thus far (because I want to impress the engineer that will come and pick up the parts), I keep asking the 'How could?' questions.
"How could I have a torsional, mechanical fatigue resulting in a shaft fracture?" One possibility (hypothesis) is misalignment. I know this because I see it all the time. While I see it often, I'm not sure how it works from a technical standpoint. Again, flashbacks from class...
Alignment
I learned about three (3) types of misalignment:
- Angular Misalignment
- Motor set at an angle to driven equipment
- If center-lines were extended they would cross each other, not run along a common center-line
2. Parallel Misalignment
- Shaft center-lines are parallel but not in line
- Offset vertically or horizontally (or both)
3. Combination Misalignment
- Motor shaft suffers from both angular and parallel misalignment
Of course the picture is more effective for me than all of those words.

Well it is getting close to the end of my shift, I will have to pick this back up tomorrow. I didn't learn too much about the causes of misalignment, so I will have to do a little research on this (or call my instructor, which is easier). I know we are getting closer to people and system's issues.
Also, by asking the 'How Can' question when exploring the physics of the failure (not just 'Why), I can add more hypotheses. While 'misalignment' is one possibility causing bending fatigue, I know there could be more, but I may not be aware of them. This is when I ask my friends and the investigators, so I can learn as I go.
With my new 'questioning attitude' I will eventually come across why they bore a hole in the key way. I'm sure that had some type of stress impact that contributed to this failure.
If I keep drilling down in this logical, evidence-based manner, I will come across some poor decisions that were made. This doesn't mean they were bad or incompetent people, often it just means they didn't have accurate or enough information to make an informed decision.
Also, sometimes when we are pressured for more production, we have to take short-cuts. When I take a short cut and nothing bad happens, I will think that step obviously is not necessary, so I won't do it anymore. Doing this, I create a new 'practice' (which is a deviation from an acceptable standard). They used a fancy research term for this scenario called 'normalization of deviance'.
Since my boss watched me take the short cut to meet the production requirement, and didn't say anything, it must be OK (in my mind). This is of course, until I take the same short cut and it causes a failure, then I will no longer be a 'hero'...I will be a 'zero and subject to discipline. Pretty hypocritical if you ask me, but that is life on the front lines!
My instructor told me it is more important to understand 'Why' someone felt they were making the right decision at the time, than who made the poor decision. It makes sense that if we understood the reasoning for the bad decision, we could correct the organizational systems and influences on the decision-makers. No one comes to work at my place, planning on making a poor decision that could cause harm to people or the process...we just have to figure out what they were thinking.

For those interested in learning more about the workshops I took on this really interesting and fun topic, just visit their website and you can become a 'manufacturing detective' also. I can't wait until the lead investigator picks up these parts and reviews my logic tree (despite the coffee stains on my paper towel), to see if I made the correct assessment of the failed surface!
Leadership Development Associate at Altria
6yCool post Bob - thanks for sharing. This story should leave some wondering how they're approaching their maintenance strategies on critical assets and machinery. Entertaining a predictive approach could have them posting success stories of how they caught a failure before it ever happened!
Especialista em Manutenção de Equipamentos Dinâmicos
6yAmazing! Not just because of the content of your article but the way that you lead your investigation. I'll check more from your website. You got a partner in Brazil. Best regards.
Practice Leader Industrial Group at Rimkus Consulting Group, Inc.
6yExcellent analysis. I agree stresses around the hole will be much higher. Also start-up torques are multiples of running torques. Both are potential contributors.