HOW TO MAKE A MDF PELMET TO HIDE CURTAIN TRACKS
A quick little DIY for you today, but one that might change how you look at dressing windows – it certainly has for me.
So when it comes to curtains, I like to go big, voluminous and taking up as much room as possible, but not over the actual window itself. My go-to is a curtain track (this Speedy Fineline one) and running it across the length of the room so that you can be flexible with the positioning and also not have to have a curtain pole, which I find too fussy.
I also really love the look of curtains set into a recess to hide the tracks, as you can see below…
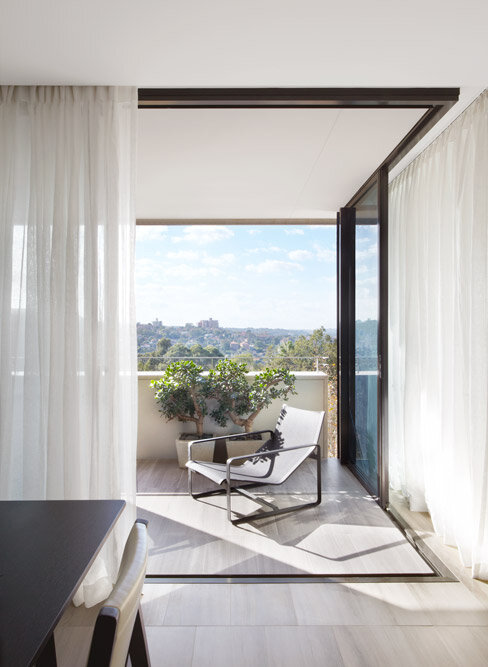
Image: Smart Design Studio
However, I’m not about to start carving out my ceiling, so I thought I’d make a simple pelmet to run across the curtain track, out of MDF and painted the same colour as the room. Similar effect, but cheap and easy. I had already done it in my bedroom, but having just done it in the living room too, I thought I’d share the quick process with you.
STEP 1
Get your materials together. I went to B&Q and got two strips cut from MDF to the same width - the length wasn’t such a problem as I have a mitre saw at home to cut to size, but you may need to work this out beforehand and have them cut this too. I also bought a piece of banister for a few £££s for attaching to the ceiling.
Hold up your piece of MDF to the position you’re happy with and make a rough mark on the ceiling behind it (closest to the window) with a pencil at several points along. This will give you the line to attach your banister pieces to.
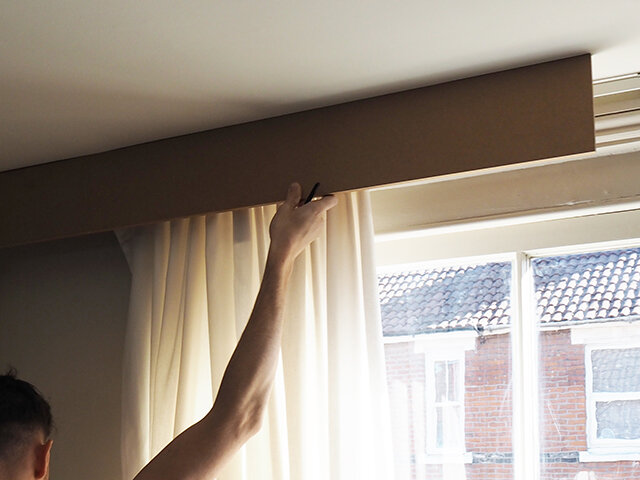

STEP 2
I did a lot of this project with strong Gorilla Glue, including a lot of the attaching of elements. You need to use the pieces of banister at several stages along for a strong finish. In the living room, I only needed to do the wall at each end and then the point where the two pieces of MDF joined. I drilled a few pilot holes in to the wood, covered one side in Gorilla Glue and then placed against the line on the ceiling, drilling a couple of screws in to keep it secure while the glue dried. The MDF isn’t majorly heavy, so the screws into the ceiling (no rawl plugs) and the glue should be enough to hold it. Wait for 24 hours for glue to cure.
STEP 3
Your MDF pieces should sit nicely against the banisters attached to the ceiling now once you’ve cut them to the perfect size. To attach, we’ll do similar – a few pilot holes into the MDF and the banister (avoiding the screws already in there) before glueing and screwing into place. I try to be careful so my MDF joins are always pretty good, but I tend to also glue a small square of MDF to the back across the join, glue it and secure with a clamp – this will definitely help the finish and avoid any cracking.


STEP 4
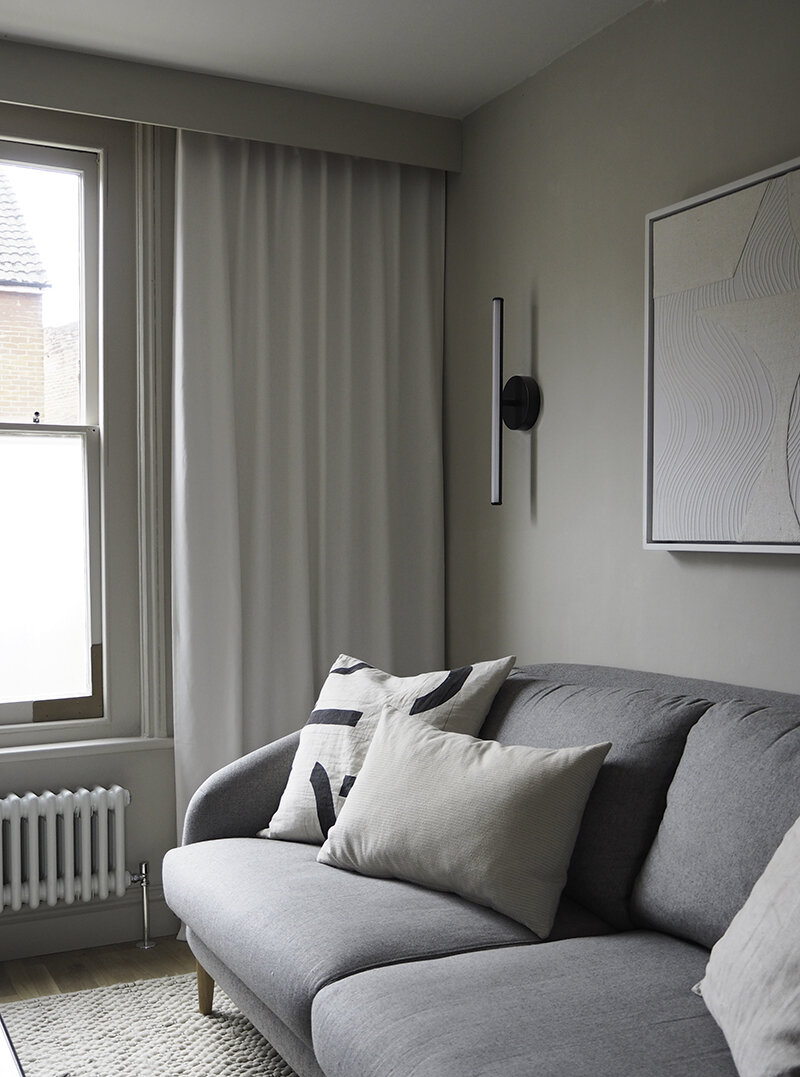
Once that’s all dry, you can start filling the gaps with interior filler such as Polyfill, along the ceiling, edges where it meets the wall and in the join between the pieces. Wait to dry and then sand down to a smooth finish. After that’s done, you can get to painting! All the ugly bits are on the other side of the pelmet and you can’t see unless your standing directly under it, but you can paint that too to make it a little bit more pretty.

In the bedroom, I did the pelmet the same colour as the ceiling, but in the living room, I thought I’d experiment and try it with the wall colour, mainly to give some contrast to the curtains, and I kinda like it!
Because I live in an old house so the walls are prone to moving slightly over time, I have noticed a little cracking in my bedroom pelmet after a year or so, but a little touch up with some polyfilla isn’t too much of a chore, or maybe even some more flexible caulking around the edges may be the answer. We’ll see!
So what do you think? Would you give this DIY a go? Let me know in the comments.