makes
12
prep
1 hour
cook
20 minutes
difficulty
Mid
makes
12
serves
preparation
1
hour
cooking
20
minutes
difficulty
Mid
level
How to decorate a cake with a drip glaze
There are a few things to keep in mind when creating a luscious glossy drip glaze on a cake.
Make sure the iced cake has been chilled for at least 30 minutes before decorating with the glaze as this will help the drips down the side of the cake set before reaching the base of the cake. Gradually spoon the slightly warm (it should be slightly warmer than room temperature) glaze onto the centre of the cake, allowing it to flow naturally towards the edge.
Use the back of a spoon to ‘push’ the glaze towards the outside. Source: Undefined / Alan Benson
Then use the back of a metal tablespoon to carefully ‘push’ the glaze towards the outside, smoothing the top and allowing small amounts of the glaze to flow over the edge and down the side of the cake to form a drip pattern.
The key is to take it slowly, not add too much glaze at one time and don’t push too firmly with the spoon as the drips will become large and cover more of the side of the cake than you want.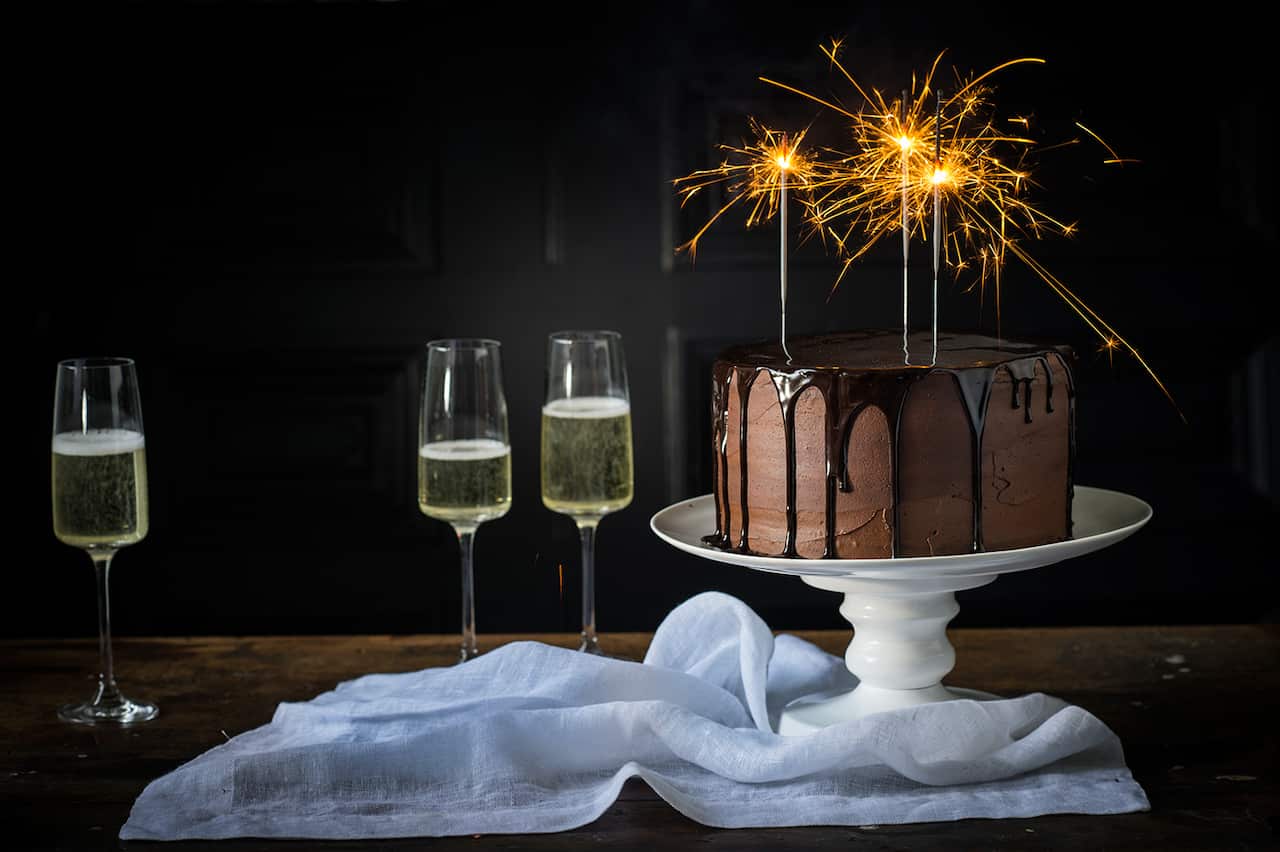
The key is to take it slowly, not add too much glaze at one time, or your drips will be too big. Source: Undefined / Alan Benson
Ingredients
Cake layers
- melted butter, to grease
- 250 g butter, cubed, softened
- 330 g (1½ cups) caster sugar
- 3 tsp natural vanilla essence or extract
- 4 eggs
- 225 g (1½ cups) plain flour
- 225 g (1½ cups) self-raising flour
- 250 ml (1 cup) milk
- 1 tbsp instant coffee granules dissolved in 1 tbsp boiling water, cooled
Dark chocolate layer
- 30 g (¼ cup) Dutch cocoa powder, sifted and combined with 60 ml (¼ cup) hot tap water, cooled
Milk chocolate layer
- 1½ tbsp Dutch cocoa powder, sifted and combined with 1½ tbsp hot tap water, cooled
Light chocolate layer
- 2 tsp Dutch cocoa powder, sifted and combined with 2 tsp hot tap water, cooled
Whipped chocolate ganache
- 500 g good-quality dark chocolate (45-54% cocoa), chopped
- 300 ml (250 ml) pure (pouring / thin) cream
Chocolate drip icing
- 100 g good-quality dark chocolate (45-54% cocoa), chopped
- 100 ml pure (thick / pouring) cream
- 2 tbsp corn syrup
Cooling time: 45 minutes
Chilling time: 1-1½ hours
Instructions
1. To make the cake layers, preheat the oven to 190°C (170°C fan-forced). Grease four shallow 20 cm round cake tins with melted butter and line the bases with non-stick baking paper.
2. Prepare the dark, milk and light chocolate layer mixtures and set aside.
3. Use an electric mixer to beat the butter, sugar and vanilla in a large mixing bowl until pale and creamy. Add the eggs one at a time, beating well after each addition (the mixture will look curdled at this stage).
4. Sift together both the flours. Combine the milk and coffee mixture. Add half the flour mixture to the butter mixture and beat on lowest possible speed until just combined. Add the milk and coffee mixture and beat on lowest possible speed until just combined and then beat in the remaining flour mixture until just combined.
5. Divide the cake batter between four bowls (each will have about 360 g of mixture). Add the Dark chocolate layer mixture to one portion and stir gently to combine. Add the Milk chocolate layer mixture to one portion and stir gently to combine. Add the Light chocolate layer mixture to one portion and stir gently to combine. Leave the fourth portion as it is
6. Spoon each of the batters into a prepared tin and smooth the surface with the back of a spoon. Bake in preheated oven for 15 minutes. Swap the cake tins around and bake for a further 5 minutes or until a skewer inserted into the centers comes out clean.
7. Stand the cakes in the tins for 5 minutes before turning onto a wire rack to cool (this will take about 30 minutes).
8. To make the whipped chocolate ganache, put the chocolate and cream in a heatproof bowl over a saucepan of simmering water (make sure the bottom of the bowl doesn’t touch the water). Stir often with a metal spoon just until the chocolate melts and the mixture is smooth. Immediately remove the bowl from the saucepan, cover with plastic wrap and place the fridge for 1-1½ hours, stirring briefly about every 5 minutes, or until cooled and thickened to a spreadable consistency. Use an electric mixer fitted with a whisk attachment to whisk the chocolate mixture in a medium bowl on low speed for 1-2 minutes or until light and fluffy (be careful not to over whisk).
9. To assemble the cake, set aside about a quarter of the Whipped chocolate ganache in a bowl for piping. Place the Dark chocolate cake layer, top side down on a cake stand or serving plate. Spread evenly with about ⅓ cup of the remaining Whipped chocolate ganache. Repeat with the remaining cake layers (from darkest to lightest) with about ⅓ cup of the ganache between each. Spread the remaining buttercream over the top and sides of the cake, using a large palette knife to smooth. Place the cake in the fridge for at least 30 minutes to chill.
10. To make the chocolate drip glaze, place the chocolate in a heatproof bowl and set aside. Combine the cream and corn syrup in a small saucepan and heat over a medium heat, stirring frequently, until almost simmering. Pour over the chocolate and set aside for 1 minutes. Stir until smooth and well combined. Place in the fridge for 15 minutes, stirring occasionally, until almost cooled to room temperature.
11. Spoon the chocolate drip glaze onto the center of the chilled cake and use the back of a metal tablespoon to spread to cover. Gently push some of the glaze over the edge all the way around to form a drip pattern. Set aside in a cool spot for about 15 minutes or until the glaze is set before cutting.
Baker’s tips
• This cake will keep in an airtight container at room temperature in a cool spot for up to 3 days.
Photography by Alan Benson. Styling by Sarah O'Brien. Food preparation by Kerrie Ray. Creative concept by Belinda So.
This recipe is part of our . Read her tips on how to cut and decorate celebration cakes.
Cook's Notes
Oven temperatures are for conventional; if using fan-forced (convection), reduce the temperature by 20˚C. | We use Australian tablespoons and cups: 1 teaspoon equals 5 ml; 1 tablespoon equals 20 ml; 1 cup equals 250 ml. | All herbs are fresh (unless specified) and cups are lightly packed. | All vegetables are medium size and peeled, unless specified. | All eggs are 55-60 g, unless specified.
How to decorate a cake with a drip glaze
There are a few things to keep in mind when creating a luscious glossy drip glaze on a cake.
Make sure the iced cake has been chilled for at least 30 minutes before decorating with the glaze as this will help the drips down the side of the cake set before reaching the base of the cake.Gradually spoon the slightly warm (it should be slightly warmer than room temperature) glaze onto the centre of the cake, allowing it to flow naturally towards the edge.
Use the back of a spoon to ‘push’ the glaze towards the outside. Source: Undefined / Alan Benson
Then use the back of a metal tablespoon to carefully ‘push’ the glaze towards the outside, smoothing the top and allowing small amounts of the glaze to flow over the edge and down the side of the cake to form a drip pattern.
The key is to take it slowly, not add too much glaze at one time and don’t push too firmly with the spoon as the drips will become large and cover more of the side of the cake than you want.
The key is to take it slowly, not add too much glaze at one time, or your drips will be too big. Source: Undefined / Alan Benson